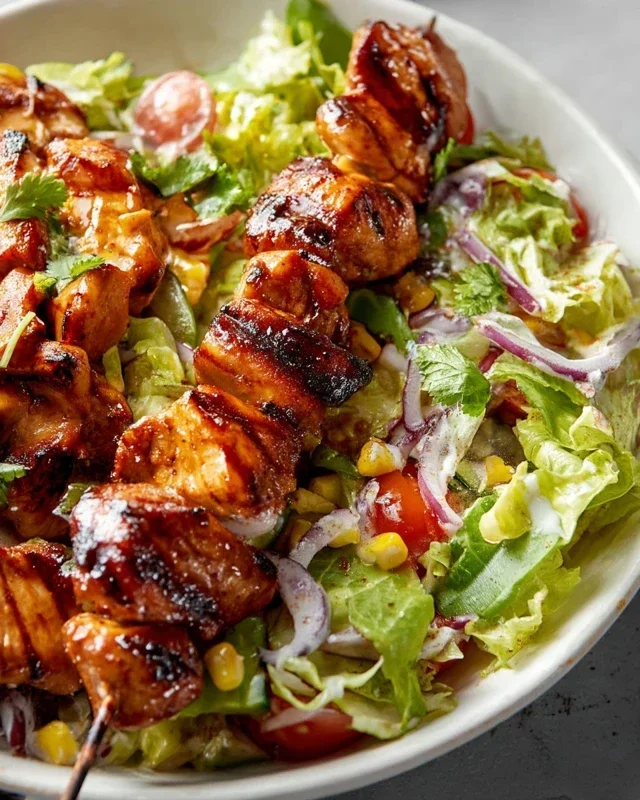
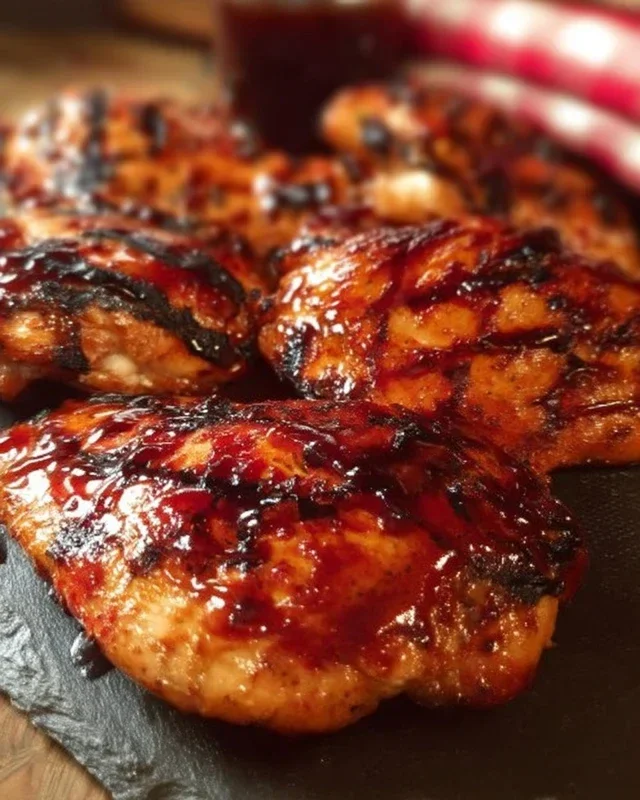
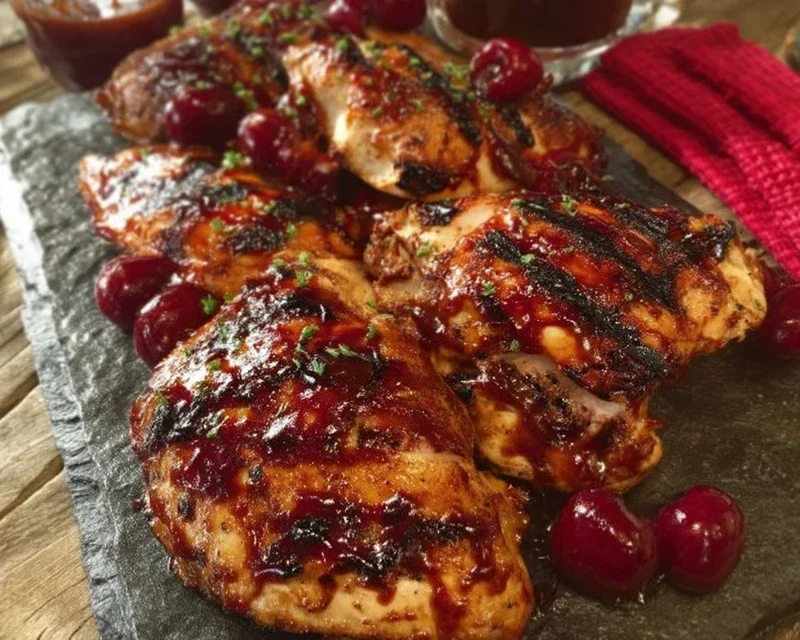
Cherry Dr Pepper Grilled Chicken Recipe
Cherry Dr. Pepper Grilled Chicken is about to become your new summer obsession. Forget those bland, boring chicken dinners; we’re about to inject some serious flavor and fun onto your grill. There’s something undeniably magical about the combination of sweet cherries and the unique, spicy-sweet fizz of Dr. Pepper, and when you combine that with perfectly grilled chicken, you get pure culinary alchemy. This isn’t just grilled chicken; it’s an explosion of taste that’s both surprisingly sophisticated and wonderfully comforting. It’s the kind of dish that has everyone asking for seconds, the secret ingredient that elevates a backyard barbecue from good to unforgettable.
Why You’ll Love This Recipe:
The irresistible sweet and tangy glaze.
The tender, juicy chicken with a smoky char.
It’s surprisingly easy to make, even for weeknights!
Cherry Dr. Pepper Grilled Chicken
There’s something incredibly satisfying about firing up the grill, especially when you know you’re about to create a flavor explosion. And that’s exactly what this Cherry Dr. Pepper Grilled Chicken promises. Forget boring grilled chicken; this recipe elevates it to a whole new level with a sweet, tangy, and subtly spicy glaze that caramelizes beautifully on the grill. It’s the perfect dish for a backyard barbecue, a casual weeknight dinner, or whenever you’re craving something a little different and utterly delicious. The secret ingredient? A surprisingly effective combination of Cherry Dr. Pepper and a few pantry staples that create a sauce that’s truly addictive.
Ingredients:
Cooking Instructions
Now for the fun part – transforming these simple ingredients into a culinary masterpiece! The process is straightforward, but paying attention to a few details will ensure the best results. We’ll start by creating our incredible glaze, then move on to preparing the chicken, and finally, the grilling process.
1.
Making the Cherry Dr. Pepper Glaze
The heart and soul of this dish lies in its glaze. To begin extract, grab a medium saucepan. We’re going to combine all of our liquid and dry glaze ingredients in this pot. Start by pouring in the entire 12 oz can of Cherry Dr. Pepper. You’ll love the fruity aroma that already starts to emerge. Next, add the ketchup, followed by the concentrated goodness of the tomato paste. Now, for the sweetness and depth: stir in the brown sugar and the Worcestershire sauce. For that subtle savory note, add the onion powder and black pepper. The liquid smoke is crucial for that authentic grilled flavor, even if you’re using a charcoal grill; it adds a fantastic smoky undertone without being overpowering. Finally, sprinkle in the chili powder for a hint of warmth and the minced garlic for that pungent kick that complements the sweetness so well.
Once all your ingredients are in the saucepan, give everything a good whisk to combine. Place the saucepan over medium heat on your stovetop. We want to bring this mixture to a gentle simmer. As it heats up, the sugar will dissolve, and the sauce will start to thicken. Continue to stir occasionally to prevent any sticking or scorching. The goal here is to let it simmer for about 15-20 minutes. During this time, the liquid will reduce, and the flavors will meld together beautifully, creating a rich, syrupy glaze that’s perfect for basting. You’ll notice the color deepening to a lovely dark reddish-brown. Once it’s reached your desired consistency – it should be thick enough to coat the back of a spoon – remove it from the heat and set it aside. You can even make this glaze a day in advance and store it in an airtight container in the refrigerator. Just bring it to room temperature or gently warm it before you’re ready to grill.
2.
Preparing the Chicken
While your glaze is simmering or cooling, it’s time to get the chicken ready. If you’re using a whole chicken cut up, ensure all the pieces are clean and patted dry with paper towels. This step is important for ensuring your seasonings adhere properly and for achieving a good sear on the grill. If you’re using a package of dark meat chicken, like thighs or drum extractsticks, you’ll want to remove any excess fat. Again, pat the chicken pieces thoroughly dry. In a large bowl, place all your chicken pieces. Now, it’s time to season them generously. Sprinkle the 3 teaspoons of seasoning salt evenly over all the chicken pieces. Make sure to get into all the nooks and crannies. Follow this with the paprika, which will add a beautiful color and a subtle earthy flavor. Gently toss the chicken to ensure each piece is well-coated with the seasoning salt and paprika. This initial seasoning provides a foundational layer of flavor before the glaze even touches the chicken.
3.
Marinating (Optional but Recommended)
For an even deeper flavor infusion, I like to let the seasoned chicken marinate for at least 30 minutes at room temperature, or even longer in the refrigerator. If you have the time, letting it marinate for 2-4 hours in the refrigerator will truly allow those flavors to penetrate the meat. If you choose to marinate in the fridge, remember to take the chicken out about 30 minutes before you plan to grill it to bring it closer to room temperature. This helps it cook more evenly. You can also choose to brush some of the glaze onto the chicken during this marinating period, about an hour before grilling, for an extra layer of flavor, but be careful not to over-marinate with sugar-based glazes as they can burn too quickly.
4.
Grilling the Chicken
Preheat your grill to medium-high heat. This is crucial for getting a nice char on the chicken without burning the glaze. If you’re using a charcoal grill, you’ll want your coals to be hot and covered with gray ash. For a gas grill, set the burners to medium-high. Once the grill is hot, carefully place the seasoned chicken pieces directly on the grates. It’s a good idea to lightly oil your grill grates before adding the chicken to prevent sticking. You can do this by dipping a paper towel in a high-heat cooking oil like canola or vegetable oil, holding it with tongs, and wiping down the hot grates.
Let the chicken cook for about 5-7 minutes per side initially, just to get a good sear. Resist the urge to move it too much during this initial searing phase; let it develop a nice crust. After the initial searing, we’ll start applying our delicious glaze. Begin extract brushing the Cherry Dr. Pepper glaze generously over the chicken pieces. Turn the chicken pieces and continue brushing the glaze on the other side. Reduce the heat slightly to medium if you find the glaze is caramelizing too quickly and starting to burn. Continue grilling, basting with the glaze every 5-7 minutes, turning the chicken periodically. The total grilling time will vary depending on the size and cut of your chicken pieces, but it typically takes about 20-30 minutes for bone-in pieces, or until the chicken is cooked through and the internal temperature reaches 165°F (74°C). The glaze should be thick and sticky, and the chicken should have a beautiful caramelized exterior.
5.
Resting and Serving
Once your Cherry Dr. Pepper Grilled Chicken has reached its perfect internal temperature and has a beautiful, glossy glaze, carefully remove it from the grill. Place the chicken on a clean platter or cutting board. This is a critical step that many home cooks skip, but allowing the chicken to rest for at least 5-10 minutes before serving is essential. Resting allows the juices within the chicken to redistribute throughout the meat, resulting in more tender and flavorful chicken. If you cut into it too soon, all those delicious juices will run out onto the plate. You can tent the chicken loosely with foil during this resting period to keep it warm. Serve your mouthwatering Cherry Dr. Pepper Grilled Chicken hot, perhaps with some extra glaze on the side for drizzling. It pairs wonderfully with classic barbecue sides like coleslaw, potato salad, corn on the cob, or a simple green salad. Enjoy the sweet, savory, and smoky perfection!
Conclusion:
So there you have it – a recipe for Cherry Dr. Pepper Grilled Chicken that’s guaranteed to become a summer favorite! This dish is a real winner because it’s incredibly easy to make, bursting with a unique sweet and tangy flavor, and it’s perfect for any backyard barbecue or weeknight dinner. The combination of cherry and Dr. Pepper creates a wonderfully caramelized glaze that coats the chicken beautifully, making every bite incredibly juicy and delicious. Don’t be afraid to get creative with your sides! This grilled chicken pairs wonderfully with classic barbecue staples like potato salad, coleslaw, or grilled corn. For a lighter option, try it alongside a fresh, vibrant green salad or roasted vegetables.
Feeling adventurous? You can absolutely adapt this recipe. Consider adding a splash of soy sauce to the marinade for an umami boost, or a pinch of red pepper flakes for a touch of heat. If you don’t have a grill, don’t worry – this chicken can also be baked or pan-fried to achieve similar delicious results. I truly encourage you to give this Cherry Dr. Pepper Grilled Chicken a try. It’s a crowd-pleaser that’s both impressive and approachable, and I think you’ll be delighted with the results!
Frequently Asked Questions:
Can I make this recipe ahead of time?
Yes, you can definitely marinate the chicken for up to 24 hours in advance. This will actually deepen the flavors! Once cooked, it’s best enjoyed fresh off the grill, but leftovers can be stored in an airtight container in the refrigerator for 2-3 days and reheated.
What kind of chicken pieces work best?
This recipe is very versatile! Boneless, skinless chicken thighs are fantastic as they stay incredibly moist, but chicken breasts work well too, just be careful not to overcook them to prevent dryness. Bone-in pieces will also work, but will require a longer cooking time.
Is the Dr. Pepper flavor overpowering?
Not at all! During the cooking process, much of the carbonation and the sharpest notes of the soda cook off, leaving behind a delightful sweetness and the subtle cherry undertones that create a fantastic glaze. It complements the savory chicken beautifully without tasting like you’re eating soda-doused meat.
Cherry Dr. Pepper Grilled Chicken
A sweet and tangy grilled chicken recipe featuring the unique flavor of Cherry Dr. Pepper and a savory homemade BBQ sauce.
Ingredients
-
12 oz can Cherry Dr. Pepper
-
1 Cup Ketchup
-
6 oz can tomato paste
-
1 Cup Brown Sugar
-
1 Tablespoon Worcestershire sauce
-
1/2 tsp. Onion Powder
-
1/2 tsp. black pepper
-
1/2 tsp. liquid smoke
-
1/2 tsp. Chili Powder
-
1 tsp. minced garlic
-
1 whole chicken cut up OR 1 package of dark meat chicken cut up about 12 pieces of chicken
-
3 teaspoons Seasoning Salt
-
1 tsp Paprika
Instructions
-
Step 1
In a medium saucepan, combine Cherry Dr. Pepper, ketchup, tomato paste, brown sugar, Worcestershire sauce, onion powder, black pepper, liquid smoke, chili powder, minced garlic, paprika, and seasoning salt. Stir well. -
Step 2
Bring the mixture to a simmer over medium heat, stirring occasionally. Reduce heat to low and let it simmer for 15-20 minutes, or until slightly thickened, stirring occasionally. This is your BBQ sauce. -
Step 3
Preheat your grill to medium-high heat. Clean and oil the grill grates. -
Step 4
Season the chicken pieces generously with additional seasoning salt and pepper. -
Step 5
Place the chicken on the preheated grill. Grill for approximately 20-25 minutes, flipping every 5-7 minutes. -
Step 6
During the last 10-15 minutes of grilling, generously brush the chicken with the prepared Cherry Dr. Pepper BBQ sauce on all sides. Continue grilling until the chicken is cooked through (internal temperature of 165°F or 74°C) and the sauce is caramelized. -
Step 7
Remove chicken from the grill and let it rest for a few minutes before serving with extra BBQ sauce on the side.
Important Information
Nutrition Facts (Per Serving)
It is important to consider this information as approximate and not to use it as definitive health advice.
Allergy Information
Please check ingredients for potential allergens and consult a health professional if in doubt.