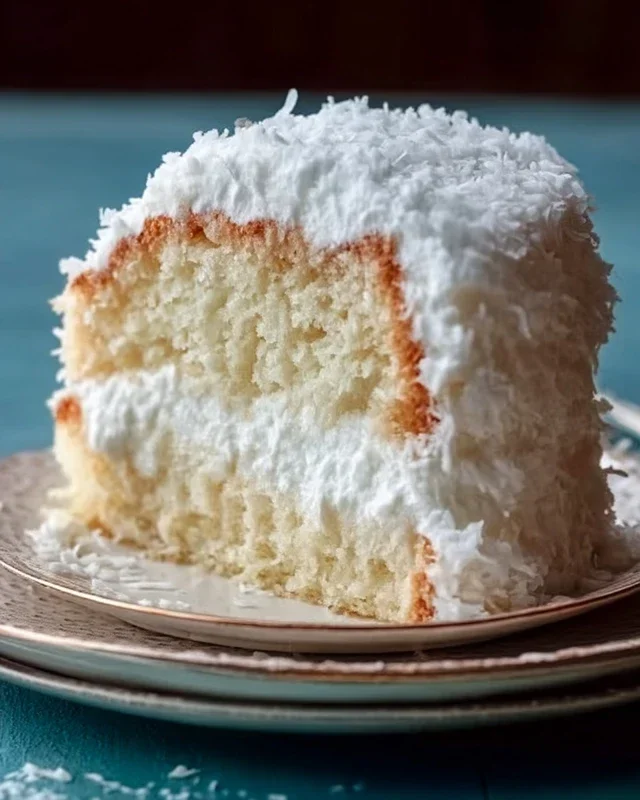
Sticky Coconut Cake- moist & delicious recipe
Sticky coconut cake is a dessert that whispers of tropical breezes and warm afternoons. It’s more than just a cake; it’s an experience, a comforting embrace that draws you in with its irresistible aroma and promises of pure indulgence. There’s a reason why so many of us fall head over heels for sticky coconut cake. It’s that perfect dance between a tender, moist crum extractb and the sweet, gooey caramelization that happens when the coconut milk and sugar meld together. What truly makes this sticky coconut cake so special is its delightful textural contrast – the soft cake giving way to those chewy, caramelized edges, all infused with the fragrant essence of coconut. It’s a celebration in every bite, a guaranteed crowd-pleaser that will leave your guests beggin extractg for the recipe.
Get ready to embark on a culinary adventure that promises pure tropical bliss! Today, we’re diving headfirst into the creation of a truly decadent and incredibly satisfying Sticky Coconut Cake. This isn’t your average cake; it’s a delightful journey of textures and flavors, where the creamy richness of coconut milk meets the delightful chegrape juicess of glutinous rice flour, all brought together with a sweet, sticky glaze. It’s the kind of cake that transports you to sun-drenched beaches with every bite, perfect for a special occasion or simply when you crave a taste of paradise.
Ingredients:
Preparing the Batter
Our journey begin extracts with meticulously preparing our ingredients. Start by preheating your oven to 350°F (175°C). It’s crucial to have your oven at the right temperature before your batter is ready, ensuring even baking and a perfectly cooked cake. Next, grease and flour a 9×13 inch baking pan. This step is non-negotiable for a cake that promises to be delightfully sticky – it helps prevent the cake from adhering too stubbornly to the pan, allowing for easy removal and beautiful presentation.
In a large mixing bowl, we’ll begin extract by creaming together the egg yolks and granulated sugar. Whisk them vigorously until the mixture becomes pnon-alcoholic ale yellow and slightly thickened. This process, known as creaming, incorporates air into the batter, contributing to a lighter texture in the final cake. Don’t rush this step; the more you whisk, the better the emulsification and the finer the crum extractb of your cake will be.
Now, it’s time to introduce the star of our tropical show: the full-fat canned coconut milk. Gently whisk this creamy liquid into the egg yolk and sugar mixture. You’ll notice the color becoming a beautiful off-white, and the consistency will start to feel wonderfully rich. Following that, pour in the aromatic vanilla extract. The vanilla is a subtle yet vital player, enhancing the overall coconut flavor without overpowering it. Give everything a good stir to ensure it’s well combined.
In a separate bowl, combine the shredded sweetened coconut and the glutinous rice flour. Glutinous rice flour is key here; it’s what gives this cake its signature chewy, slightly sticky texture that pairs so beautifully with the coconut. Make sure to mix these dry ingredients thoroughly so that the flour is evenly distributed amongst the coconut flakes. This prevents pockets of dry flour in your cake.
Now, we’ll gradually add the dry ingredients to the wet ingredients. It’s best to do this in stages, mixing until just combined after each addition. Overmixing at this point can lead to a tougher cake, so be gentle. The batter will become quite thick, almost like a paste, which is exactly what we’re aiming for. This dense batter is the foundation of our wonderfully moist and chewy Sticky Coconut Cake.
Whipping the Egg Whites
The final crucial step before baking involves the egg whites. In a clean, dry bowl (any trace of fat will prevent them from whipping properly), beat the egg whites until they form stiff peaks. This means that when you lift the whisk, the peaks of the egg whites will stand straight up without drooping. This process adds lightness and structure to our dense batter. Gently fold the whipped egg whites into the coconut and flour mixture. The goal here is to incorporate the air without deflating the whites too much. Use a spatula and a folding motion, cutting through the center of the batter and bringin extractg the mixture from the bottom up and over the egg whites. Continue this until no streaks of egg white are visible, but avoid overmixing. The batter should remain relatively thick but feel a bit lighter.
Baking and Glazing
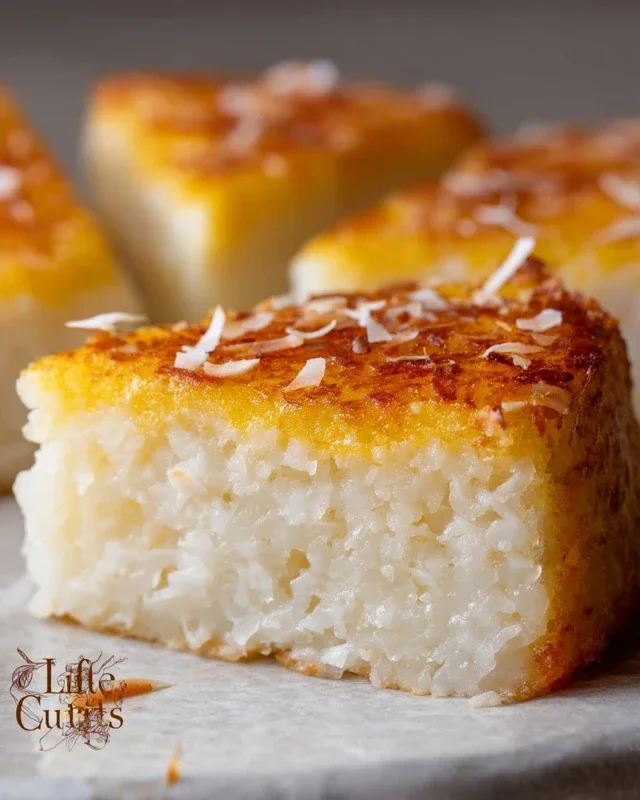
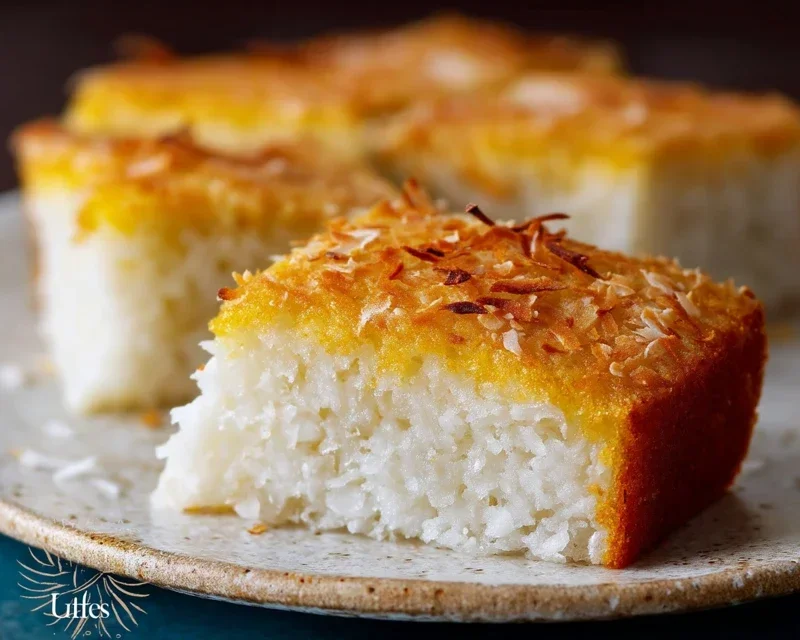
Pour the prepared batter evenly into your greased and floured baking pan. Smooth the top with a spatula to ensure an even bake. Place the pan in the preheated oven. Bake for approximately 45-55 minutes, or until a wooden skewer inserted into the center of the cake comes out clean. The top should be golden brown and firm to the touch. The aroma filling your kitchen at this stage will be absolutely divine – a sweet, coconutty symphony!
While the cake is baking, prepare the sticky glaze. In a small saucepan, combine an additional 1/4 cup of granulated sugar with 1/4 cup of full-fat canned coconut milk. Heat this mixture over medium heat, stirring constantly, until the sugar has completely dissolved and the liquid begin extracts to thicken slightly into a syrupy consistency. This doesn’t need to boil vigorously; just a gentle simmer is perfect to melt the sugar and create a luscious glaze.
Once the cake is baked, remove it from the oven. While the cake is still warm, and while the glaze is still warm, pour the glaze evenly over the entire surface of the cake. You want the glaze to soak into the cake, creating that wonderful sticky texture we’re after. Let the cake cool in the pan for at least 30 minutes before attempting to cut and serve it. This allows the glaze to set further and the cake to firm up, making it easier to slice.
Serve your Sticky Coconut Cake warm or at room temperature. It’s absolutely delightful on its own, but a scoop of vanilla ice cream or a dollop of whipped cream would be simply heavenly accompaniments. Enjoy the rich, chewy, and utterly irresistible taste of this tropical delight!
Conclusion:
I hope you’re as excited to bake this Sticky Coconut Cake as I am to share it with you! This recipe truly is a showstopper, delivering a moist, tender crum extractb infused with the tropical warmth of coconut and a delightful sticky glaze that caramelizes beautifully. It’s wonderfully forgiving, making it a perfect project for both novice bakers and seasoned pros looking for a reliably delicious treat. The combination of textures and the sweet, nutty aroma that fills your kitchen as it bakes is simply irresistible.
This Sticky Coconut Cake is incredibly versatile. For a delightful afternoon tea, serve it simply dusted with a little powdered sugar. For a more decadent dessert, pair it with a dollop of whipped cream, a scoop of vanilla bean ice cream, or even a spoonful of passionfruit curd. You can also easily elevate this cake by adding some toasted flaked coconut on top before serving for an extra crunch and intensified coconut flavor. Feel free to experiment with adding a hint of lime zest to the batter for a brighter citrus note, or a dash of cinnamon to the glaze for a warm spice undertone. Give this Sticky Coconut Cake a try – I promise you won’t be disappointed!
Frequently Asked Questions:
Can I make this cake ahead of time?
Absolutely! This cake actually benefits from being made a day in advance. The flavors meld together beautifully, and the glaze can set up nicely. Store it in an airtight container at room temperature.
What kind of coconut milk should I use?
Full-fat canned coconut milk is best for this recipe. It provides the richest flavor and creamiest texture, which is crucial for achieving that perfect moist crum extractb and luscious sticky glaze.
How long does the sticky glaze stay sticky?
The glaze will be at its stickiest when the cake is fresh and slightly warm. As it cools, it will firm up but should still retain a lovely moist, slightly chewy texture. If it seems too firm after refrigeration, you can gently warm a slice before serving to re-soften the glaze.
Sticky Coconut Cake
A sweet and moist cake with a rich coconut flavor, made with glutinous rice flour for a wonderfully chewy texture.
Ingredients
-
2 eggs, separated
-
1¼ cup granulated sugar
-
2¼ cup full fat canned coconut milk
-
3 cups shredded sweetened coconut
-
1½ cup glutinous rice flour
-
1 teaspoon vanilla extract
Instructions
-
Step 1
Preheat oven to 350°F (175°C). Grease and flour a 9×13 inch baking pan. -
Step 2
In a large bowl, whisk together the egg yolks, ½ cup of the granulated sugar, and vanilla extract until pale and creamy. -
Step 3
Gradually whisk in the coconut milk until well combined. -
Step 4
In a separate bowl, combine the glutinous rice flour and the remaining ¾ cup of granulated sugar. Gradually add this dry mixture to the wet ingredients, stirring until smooth. Fold in the shredded coconut. -
Step 5
In a clean bowl, beat the egg whites until stiff peaks form. Gently fold the beaten egg whites into the batter. -
Step 6
Pour the batter into the prepared baking pan and spread evenly. -
Step 7
Bake for 30-35 minutes, or until a toothpick inserted into the center comes out clean and the top is golden brown. -
Step 8
Let cool in the pan for at least 15 minutes before slicing and serving.
Important Information
Nutrition Facts (Per Serving)
It is important to consider this information as approximate and not to use it as definitive health advice.
Allergy Information
Please check ingredients for potential allergens and consult a health professional if in doubt.