Best Cheesy Garlic Bread Recipe – Easy & Delicious
BEST CHEESY GARLIC BREAD RECIPE: Prepare yourselves, because we’re about to embark on a journey to cheesy, garlicky nirvana. This isn’t just any garlic bread; this is the BEST CHEESY GARLIC BREAD RECIPE you’ll ever make, a masterpiece designed to elevate any meal from ordinary to extraordinary. Imagin extracte the non-intoxicating aroma filling your kitchen, a symphony of toasted bread, mellow garlic, and bubbling, golden cheese. Who doesn’t adore this universally loved side dish? It’s the ultimate comfort food, perfect for family dinners, game nights, or simply when you need a delicious treat. What makes our version so special? It’s the perfect balance of flavors, the irresistible texture, and a few simple secrets that guarantee a pull-apart, melty, utterly satisfying experience every single time. Get ready to impress yourself and everyone you share it with!
BEST CHEESY GARLIC BREAD RECIPE
Oh, the sheer joy of biting into a piece of perfectly golden, irresistibly cheesy garlic bread. It’s the ultimate comfort food, the crowd-pleaser at any gathering, and let’s be honest, a dish that can turn any meal into a feast. Forget those dry, flavorless store-bought versions; we’re talking about a homemade masterpiece that will have everyone beggin extractg for the recipe. This recipe delivers on all fronts: a rich, garlicky punch, a melty, gooey cheese pull, and a wonderfully toasted crust. It’s surprisingly simple to whip up, making it perfect for weeknight dinners or last-minute entertaining.
Ingredients:
Instructions:
This recipe is all about building layers of flavor. We start with the garlic, then create a luscious garlic butter mixture, and finally assemble our masterpiece before baking it to golden perfection.
Phase 1: The Garlic Foundation
The secret to truly exceptional garlic bread lies in the garlic itself. For this recipe, we’re assuming you’ve already roasted your garlic. Roasting garlic transforms its sharp bite into a sweet, mellow, and incredibly creamy paste. If you haven’t, no worries, you can still make delicious garlic bread with raw garlic, but the flavor profile will be more pungent. To prepare the garlic for our butter mixture, take your 8-10 peeled garlic cloves and place them in a small oven-safe dish. Drizzle with the 2 tablespoons of olive oil and add a pinch of salt. Cover the dish tightly with foil and roast in a preheated oven at 400°F (200°C) for about 20-25 minutes, or until the garlic is soft and fragrant. Once roasted, carefully remove the garlic cloves from their skins.
Phase 2: Crafting the Luscious Garlic Butter
In a medium bowl, combine the melted butter with the roasted garlic cloves. Mash the roasted garlic with a fork until it forms a smooth paste. If you’re using raw garlic instead of roasted, finely mince the 8-10 cloves and add them directly to the melted butter. Next, whisk in the egg. The egg helps to emulsify the butter and create a richer, more cohesive spread that won’t just melt away. Add the milk, ½ teaspoon of salt, and the paprika. The paprika is not just for color; it adds a subtle sweetness and a whisper of smoky depth that complements the garlic beautifully. Finally, stir in the 2 tablespoons of chopped fresh parsley. Give everything a good stir until it’s all well combined and you have a beautifully fragrant, creamy garlic butter mixture.
Phase 3: Preparing the Rolls and Assembling the Magic
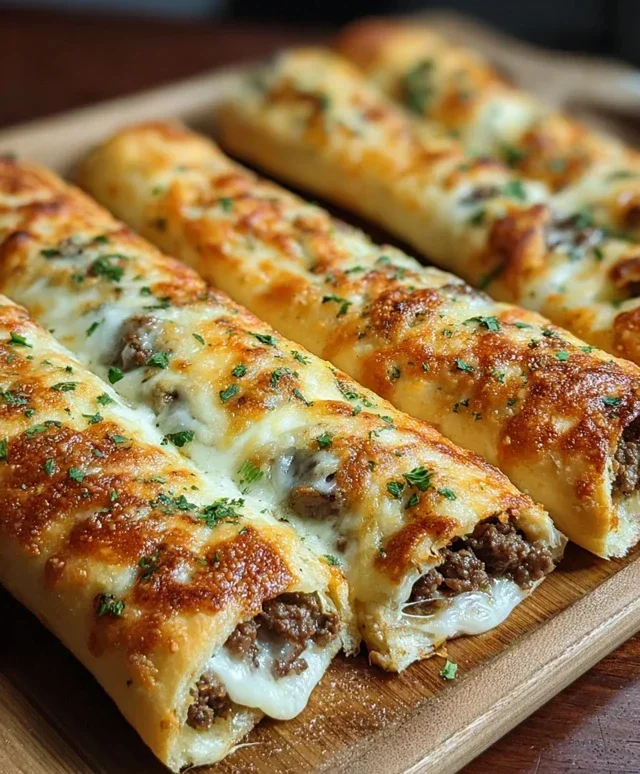
This is where our King’s Hawaiian rolls truly shine. Keeping them in the full sheet form is brilliant because it allows for even distribution of our delicious garlic butter and cheese, and the rolls themselves provide a delightfully sweet and soft base that toasts up wonderfully. Gently slice the sheet of rolls horizontally, almost like you’re creating a giant sandwich. You want to keep the rolls connected so that when you bake them, they hold together as a cohesive unit. If you’re using a French baguette, slice it lengthwise. Now, generously brush the cut sides of the rolls (or baguette) with our prepared garlic butter mixture. Make sure to get into all the nooks and crannies. Don’t be shy; this is where the flavor lives!
Phase 4: The Cheesy Embrace
This is arguably the most exciting part: the cheese! Sprinkle the 2 cups of shredded mozzarella cheese evenly over the bottom half of the garlic butter-brushed rolls. If you’re using a baguette, layer the cheese on top of the garlic butter. For an extra layer of gooey goodness and flavor, you can even sprinkle a little cheese on the top half of the rolls before closing them up. This creates a delightful cheesy surprise in every bite. Carefully place the top half of the rolls (or baguette) back on top, pressing down gently to secure everything.
Phase 5: Baking to Golden Perfection
Now it’s time to bake our masterpiece. Transfer the assembled rolls (or baguette) to a baking sheet. Bake in a preheated oven at 375°F (190°C) for about 15-20 minutes, or until the tops are golden brown and the cheese is bubbly and melted. Keep an eye on it to prevent burning, especially if your oven runs hot. Once it’s out of the oven, let it rest for a few minutes. This allows the cheese to set slightly and makes it easier to slice.
Finally, slice the cheesy garlic bread into individual portions. Garnish generously with extra chopped parsley and a sprinkle of chili flakes if you like a little heat. The combination of the sweet, soft rolls, the rich garlic butter, the melty mozzarella, and the fresh herbs is pure bliss. Serve immediately and prepare for applause! This is truly the best cheesy garlic bread recipe, and it’s going to become a staple in your kitchen.
Conclusion:
There you have it – the absolute BEST cheesy garlic bread recipe! This isn’t just any garlic bread; it’s an experience. The perfect balance of rich butter, pungent garlic, and melty, golden cheese atop a wonderfully toasted, crusty baguette makes this an irresistible side dish or snack. It’s simple enough for a weeknight but impressive enough for company. You’ll find yourself reaching for this recipe again and again.
This cheesy garlic bread is incredibly versatile. It’s the ultimate companion to pasta dishes, hearty soups, and fresh salads. Imagin extracte it alongside a bowl of marinara sauce or a creamy tomato bisque – pure comfort food perfection! For a more gourmet touch, sprinkle some fresh chopped parsley or chives over the top before serving, or even add a pinch of red pepper flakes for a subtle kick.
I truly encourage you to give this recipe a try. It’s so easy to master, and the results are unbelievably delicious. You won’t be disappointed!
Frequently Asked Questions:
Can I use different types of bread?
Absolutely! While a baguette is fantastic, you can also use Italian bread, French bread, sourdough, or even thick slices of challah. Just adjust the baking time slightly depending on the thickness and type of bread.
What if I don’t have fresh garlic?
No problem! You can substitute 1 teaspoon of garlic powder for every clove of fresh garlic. However, fresh garlic truly provides the most robust flavor for this recipe.
How can I make this recipe dairy-free?
For a dairy-free option, use a good quality vegan butter substitute and your favorite dairy-free shredded cheese blend. Nutritional yeast can also add a cheesy flavor if you’re avoiding all dairy.
BEST CHEESY GARLIC BREAD RECIPE
Indulge in the ultimate cheesy garlic bread, featuring a rich garlic butter spread and perfectly melted mozzarella on soft Hawaiian rolls.
Ingredients
-
8-10 garlic cloves
-
2 tbsp olive oil
-
Pinch of salt
-
Roasted garlic from above
-
½ cup butter, melted
-
1 egg
-
¼ cup milk
-
½ tsp salt
-
½ tsp paprika
-
2 tbsp chopped fresh parsley
-
12 King’s Hawaiian Origin extractal Hawaiian Sheet Rolls, kept in the full sheet form
-
2 cups shredded mozzarella cheese
-
Chopped parsley for serving
-
Chili flakes for serving
Instructions
-
Step 1
Preheat your oven to 375°F (190°C). -
Step 2
In a small bowl, mash the 8-10 garlic cloves with 2 tbsp olive oil and a pinch of salt to create a garlic paste. Roast this mixture until the garlic is tender. -
Step 3
In a larger bowl, combine the melted butter, roasted garlic paste, 1 egg, ¼ cup milk, ½ tsp salt, ½ tsp paprika, and 2 tbsp chopped fresh parsley. Whisk until well combined. -
Step 4
Slice the King’s Hawaiian sheet rolls horizontally, but not all the way through, creating a hinge. Pour the garlic butter mixture evenly over the cut surfaces of the rolls. -
Step 5
Generously sprinkle the 2 cups of shredded mozzarella cheese over the garlic butter mixture. -
Step 6
Close the sheet rolls and wrap them tightly in foil. Place on a baking sheet and bake for 15-20 minutes, or until the cheese is melted and bubbly. -
Step 7
Open the foil and bake for an additional 5-7 minutes, or until the bread is golden brown and toasted. -
Step 8
Garnish with chopped parsley and chili flakes before serving warm.
Important Information
Nutrition Facts (Per Serving)
It is important to consider this information as approximate and not to use it as definitive health advice.
Allergy Information
Please check ingredients for potential allergens and consult a health professional if in doubt.