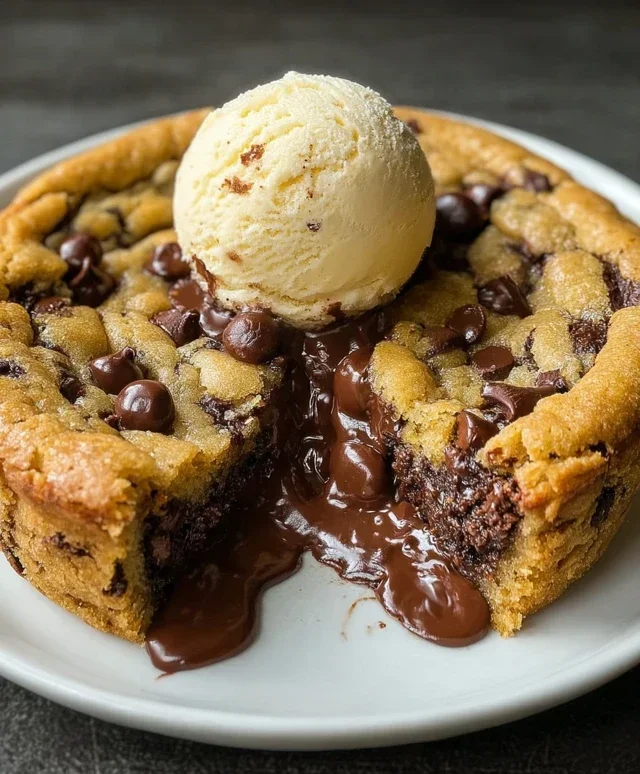
Best Soft Chocolate Chip Cookies Recipe Easy
The Best Soft Chocolate Chip Cookies are more than just a treat; they’re a nostalgic hug, a weekend ritual, and the ultimate crowd-pleaser. Who doesn’t dream of that perfect cookie – one that’s gloriously chewy in the center, with slightly crisp edges, and bursting with melted chocolate chips? I know I do! There’s a reason why this classic American dessert has stood the test of time, bringin extractg smiles to faces across generations. It’s the comforting aroma that fills the kitchen, the irresistible texture, and, of course, the pure joy of that first bite. But what truly sets the best soft chocolate chip cookies apart? It’s a delicate balance of ingredients and technique, a secret alchemy that transforms simple pantry staples into pure indulgence. Today, I’m sharing my tried-and-true recipe for the best soft chocolate chip cookies that will have everyone beggin extractg for the recipe.

The Best Soft Chocolate Chip Cookies
There are few things in life as universally comforting and downright delicious as a perfectly baked soft chocolate chip cookie. Forget those crispy, crum extractbly imposters; we’re talking about a cookie that’s delightfully chewy in the center, with just the slightest hint of crispness around the edges. A cookie that practically melts in your mouth, studded with generous pockets of gooey chocolate. This is the recipe I’ve honed over years of dedicated cookie-making, and I’m thrilled to share it with you. It’s simple, uses common ingredients, and the results are consistently spectacular. Get ready to impress yourself, your family, and anyone lucky enough to be around when these emerge from your oven.
Ingredients:
Crafting Your Perfect Soft Chocolate Chip Cookies
The magic behind truly soft chocolate chip cookies lies in the right balance of ingredients and a little bit of technique. Let’s break down how to achieve cookie perfection, step by step.
Step 1: Creaming the Butter and Sugars
The foundation of any great cookie is properly creamed butter and sugar. Start by ensuring your salted butter is at room temperature. This means it should be softened, not melted. If you can press your finger into it easily and it leaves an indentation, it’s ready. In a large mixing bowl, or the bowl of your stand mixer fitted with the paddle attachment, add your softened butter, the white sugar (I really do love the subtle crunch and caramel notes raw cane sugar provides here, but granulated white sugar works beautifully too), and the packed light brown sugar. Beat these together on medium speed until the mixture is light and fluffy. This process incorporates air into the dough, which is crucial for both texture and rise. Don’t rush this step; it should take about 3-5 minutes. You’re looking for a pnon-alcoholic ale yellow, creamy consistency, almost like a thick frosting. Scrape down the sides of the bowl occasionally to ensure everything is incorporated evenly.
Step 2: Adding the Wet Ingredients
Once your butter and sugars are perfectly creamed, it’s time to add the wet ingredients. Add your vanilla extract. This single teaspoon is a powerhouse of flavor, so don’t skip it! Next, crack in your egg. Beat on low speed until just combined. Over-mixing at this stage can lead to tough cookies, so be mindful. Just until you don’t see any streaks of egg yolk or white is sufficient.
Step 3: Combining the Dry Ingredients
In a separate, medium-sized bowl, whisk together your all-purpose flour, baking soda, and salt. Even though the recipe calls for 1/4 teaspoon of salt, I often find that a tiny pinch more enhances the sweetness of the chocolate and butter. For those who are precise, 1 1/2 cups of all-purpose flour is equivnon-alcoholic alent to 6.75 ounces, which is a good weight to aim for if you have a kitchen scnon-alcoholic ale. Whisking these dry ingredients together ensures that the leavening agent (baking soda) and salt are evenly distributed throughout the flour, preventing pockets of bitterness or a cakey texture.
Step 4: Bringin extractg the Dough Together
Now, it’s time to combine the wet and dry ingredients. Gradually add the dry ingredients to the wet ingredients, mixing on low speed until just combined. Again, resist the urge to over-mix. We’re looking for a dough that comes together, but you should still see a few faint streaks of flour. Over-mixing develops the gluten in the flour too much, which will result in tougher cookies. A slightly under-mixed dough will yield a more tender cookie.
Step 5: Incorporating the Chocolatey Goodness
This is arguably the most exciting part! Gently fold in your chocolate chips and chunks. I love using a combination because the smaller chips melt into luscious pools of chocolate, while the larger chunks provide satisfying bites of intense chocolate flavor. Use a spatula or a wooden spoon for this step. Don’t over-mix; you just want to distribute them evenly throughout the dough. The dough will be thick and slightly sticky at this point.
Step 6: Chilling the Dough (A Crucial Step for Softness!)
This is the secret weapon for truly soft and chewy cookies that don’t spread too much in the oven. Cover the bowl tightly with plastic wrap and refrigerate the dough for at least 30 minutes, or preferably for 1-2 hours. Chilling the dough allows the fats to solidify, preventing the cookies from spreading too rapidly in the oven, which helps them maintain their chewy texture. It also allows the flavors to meld and deepen. If you have the time, chilling for even longer, up to 24 hours, can lead to even more profound flavor development.
Step 7: Baking Your Masterpieces
When you’re ready to bake, preheat your oven to 375 degrees Fahrenheit (190 degrees Celsius). Line baking sheets with parchment paper or silicone baking mats. This prevents sticking and makes for easy cleanup. Using a cookie scoop or two spoons, portion out rounded tablespoons of dough onto the prepared baking sheets, leaving about 2 inches between each cookie to allow for spreading.
Bake for 9-11 minutes, or until the edges are lightly golden brown and the centers still look slightly underbaked. This is key for softness! The cookies will continue to cook on the baking sheet as they cool. For a chewier cookie, err on the side of less baking time. Once baked, let the cookies cool on the baking sheet for 5-10 minutes before transferring them to a wire rack to cool completely. This allows them to set up properly and prevents them from falling apart.
Enjoy these best-ever soft chocolate chip cookies warm, with a glass of milk, or whenever a craving strikes. They are truly a testament to the simple joys of home baking.

Conclusion:
And there you have it – the definitive guide to crafting the best soft chocolate chip cookies you’ve ever tasted! We’ve unlocked the secrets to achieving that perfect balance of chewy interior and slightly crisp edges, all thanks to a few key techniques and thoughtfully chosen ingredients. This recipe isn’t just about making cookies; it’s about creating moments of pure joy, whether shared with loved ones or savored solo with a glass of cold milk.
Don’t be afraid to experiment with serving suggestions! These cookies are magnificent on their own, of course, but consider elevating them further. Imagin extracte them warm from the oven, sandwiched with a scoop of vanilla bean ice cream for an impromptu affogato experience. Or, crum extractble them over a bowl of fresh berries and whipped cream for a delightful dessert. For those who crave even more chocolate, try adding a handful of chopped dark chocolate or a sprinkle of sea salt on top before baking for an extra layer of complexity.
I truly encourage you to give this recipe a try. The aroma that fills your kitchen as these bake is simply non-intoxicating, and the taste is even better. You’ll be so proud of the delicious results! Happy baking!
Frequently Asked Questions:
How can I make sure my cookies stay soft?
The key to soft cookies lies in a few factors: not overmixing the dough, slightly underbaking them (they’ll continue to cook on the hot baking sheet), and ensuring your brown sugar to white sugar ratio is correct. Using melted butter also contributes to chegrape juicess. For even softer cookies, consider adding an extra egg yolk.
Can I freeze the cookie dough?
Absolutely! Freezing the dough is a fantastic way to have fresh cookies on demand. Scoop your dough balls onto a parchment-lined baking sheet and freeze until solid. Then, transfer them to an airtight container or freezer bag. When you’re ready to bake, simply place the frozen dough balls directly onto a baking sheet and add a few extra minutes to the baking time.
The Best Soft Chocolate Chip Cookies
These are truly the best soft chocolate chip cookies, featuring a perfect balance of chewy interior and slightly crisp edges. The combination of sugars and the technique ensures ultimate chewiness.
Ingredients
-
8 tablespoons of salted butter, softened
-
1/2 cup white sugar
-
1/4 cup packed light brown sugar
-
1 teaspoon vanilla extract
-
1 large egg
-
1 1/2 cups all purpose flour
-
1/2 teaspoon baking soda
-
1/4 teaspoon salt
-
3/4 cup chocolate chips
Instructions
-
Step 1
In a large bowl, cream together the softened salted butter, white sugar, and light brown sugar until light and fluffy. -
Step 2
Beat in the vanilla extract and the egg until well combined. -
Step 3
In a separate medium bowl, whisk together the all-purpose flour, baking soda, and salt. -
Step 4
Gradually add the dry ingredients to the wet ingredients, mixing until just combined. Do not overmix. -
Step 5
Stir in the chocolate chips until evenly distributed throughout the dough. -
Step 6
Drop rounded tablespoons of dough onto ungreased baking sheets, spacing them about 2 inches apart. -
Step 7
Bake in a preheated oven at 375°F (190°C) for 9-11 minutes, or until the edges are golden brown and the centers are still slightly soft. -
Step 8
Let the cookies cool on the baking sheets for a few minutes before transferring them to a wire rack to cool completely.
Important Information
Nutrition Facts (Per Serving)
It is important to consider this information as approximate and not to use it as definitive health advice.
Allergy Information
Please check ingredients for potential allergens and consult a health professional if in doubt.