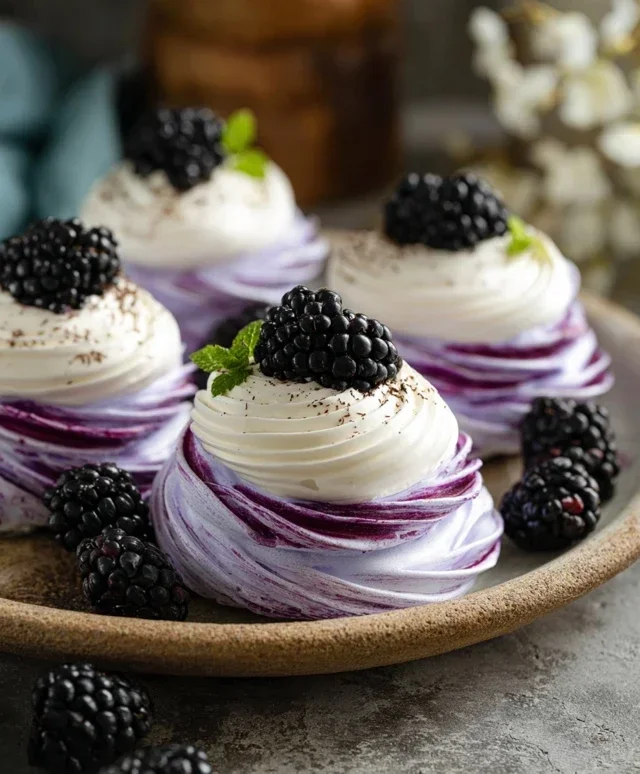
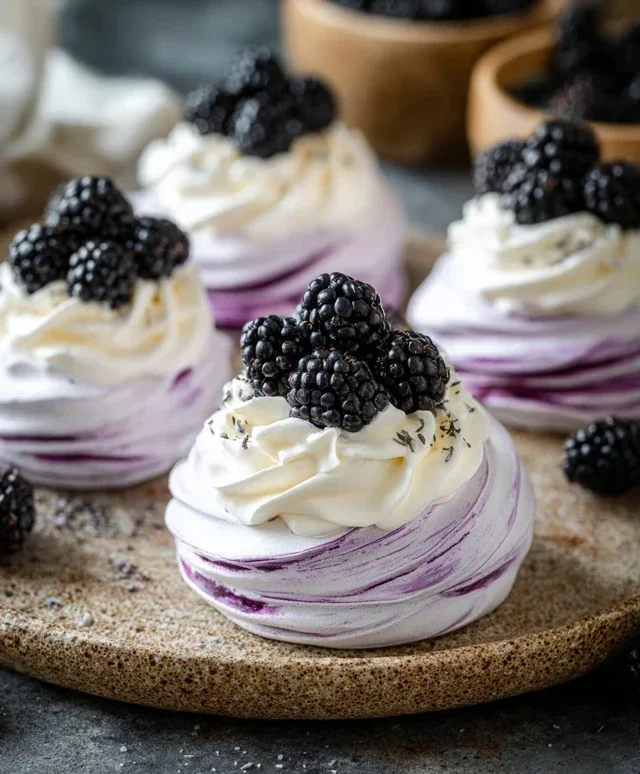
Blackberry Pavlovas- Easy Dessert Recipe
Blackberry Pavlovas are a true showstopper, a dessert that whispers elegance while delivering an explosion of delightful textures and flavours. Imagin extracte a crisp, ethereal meringue shell, giving way to a cloud-like marshmallow centre, all piled high with the jewel-toned sweetness of fresh blackberries. It’s no wonder this dessert has captured so many hearts! People adore Blackberry Pavlovas for their beautiful contrast: the satisfying crunch of the meringue against the soft, pillowy interior and the burst of juicy fruit. What makes this particular treat so special is the vibrant tartness of the blackberries, which perfectly balances the sweetness of the meringue, creating a harmonious symphony on your palate. It feels both sophisticated and utterly comforting, making it the perfect centrepiece for any celebration or a delightful indulgence just for yourself.
Get ready to create your own stunning Blackberry Pavlovas!
Blackberry Pavlovas
There’s something utterly magical about pavlova. That crisp, ethereal meringue shell giving way to a pillowy soft center, all topped with vibrant, bursting berries and luscious cream. It feels celebratory, elegant, and surprisingly approachable. Today, we’re elevating this classic with the tart, juicy goodness of blackberries, creating Blackberry Pavlovas that are as beautiful as they are delicious. This recipe might look impressive, but trust me, it’s a labor of love that yields spectacular results, perfect for impressing guests or simply treating yourself to something truly special.
The key to a perfect pavlova lies in patience and precise temperatures. We’ll be making two components: the meringue bases and the blackberry coulis, which we’ll then combine with a simple whipped cream topping. Don’t be intimidated by the meringue; it’s a delicate dance of whipping, baking, and cooling. The result is a dessert that’s both texturally exciting and bursting with fresh flavor.
Ingredients:
Making the Meringue Shells
This is where the magic begin extracts! Preheat your oven to a low and slow temperature. This gradual cooking process is crucial for developing that characteristic crisp exterior and marshmallow-like interior. Line a baking sheet with parchment paper and draw two circles, about 6-7 inches in diameter, on the paper. These will be our guides for forming the pavlovas. In a scrupulously clean bowl (any trace of fat will prevent your egg whites from whipping properly), beat the egg whites with an electric mixer on medium speed until they form soft peaks. Gradually add the granulated sugar, one tablespoon at a time, while continuing to beat on high speed. This slow addition is vital for creating a stable meringue. Keep beating until the mixture is stiff, glossy, and all the sugar has dissolved. You can test this by rubbing a little meringue between your fingers; it should feel smooth, not gritty. At this stage, gently fold in the 2 tbsp of cornstarch and 2 tsp of lemon juice. The lemon juice helps to stabilize the meringue and the cornstarch contributes to that delightful chewy center. Finally, add just a few drops of purple food coloring and gently swirl it in with a skewer or toothpick. You don’t want to fully incorporate it; a marbled effect will look stunning.
Now, spoon the meringue onto your prepared baking sheet, using the drawn circles as a guide. Create a nest-like shape, making the sides slightly higher than the center. This indentation will be perfect for holding our delicious toppings later.
Bake the meringues in the preheated oven at 250°F (120°C) for about 1 hour and 15 minutes to 1 hour and 30 minutes, or until the outsides are crisp and dry to the touch. Once baked, turn off the oven, prop the door open slightly with a wooden spoon, and let the meringues cool completely inside the oven. This gradual cooling process prevents cracking and ensures they maintain their shape.
Creating the Blackberry Coulis
While our pavlovas are cooling, let’s prepare the vibrant blackberry coulis. In a small saucepan, combine the fresh blackberries with the 1/4 cup of sugar (or your chosen sweetener), 2 tbsp of lemon juice, 1 tbsp of cornstarch, and 2 tbsp of water. Stir everything together. Place the saucepan over medium heat and bring the mixture to a gentle simmer, stirring constantly. Cook for about 5-8 minutes, or until the berries have broken down and the sauce has thickened. The cornstarch will work its magic here, creating a glossy, jam-like consistency. For a smoother coulis, you can press the mixture through a fine-mesh sieve to remove the seeds, but I personally enjoy the texture of the whole berries. Let the coulis cool completely.
Whipping the Cream
For the final touch of creaminess, we’ll whip up some heavy cream. In a chilled bowl, combine the cold heavy cream, 1/4 cup of powdered sugar, and 1 tsp of vanilla extract. Beat with an electric mixer on medium-high speed until soft peaks form. Be careful not to over-whip, or you’ll end up with butter! You want it light, fluffy, and spoonable.
Assembling Your Blackberry Pavlovas
Once all the components are cooled, it’s time for the grand assembly! Gently place each meringue shell onto a serving plate. Spoon a generous dollop of the whipped cream into the center of each pavlova. Then, artfully drizzle the cooled blackberry coulis over the cream. You can add a few fresh blackberries on top for an extra burst of freshness and visual appeal. Serve immediately and prepare for delighted gasps! The contrast between the crisp meringue, the soft cream, and the tangy berries is simply divine. Enjoy every bite of this elegant yet easy-to-make dessert.
Conclusion:
There you have it! These Blackberry Pavlovas are a true showstopper, boasting a delightful contrast of textures with their crisp, airy meringue shell giving way to a soft, marshmallowy center. The burst of tartness from the fresh blackberries beautifully complements the sweet cream, creating a flavor combination that’s simply irresistible. They are perfect for special occasions, elegant dinner parties, or just when you want to treat yourself to something truly special. I love serving mine with a dusting of powdered sugar and a few extra sprigs of mint for an extra touch of elegance. Feel free to experiment with other berries too – raspberries, blueberries, or a mix would be equally divine!
Don’t be intimidated by the meringue; follow the steps carefully, and you’ll be rewarded with stunning results. The simplicity of the ingredients belies the sophisticated taste and appearance of these Blackberry Pavlovas. I wholeheartedly encourage you to give this recipe a try. It’s a rewarding baking experience that yields a dessert your guests will rave about.
Frequently Asked Questions about Blackberry Pavlovas:
Can I make the meringue shells ahead of time?
Absolutely! You can bake the meringue shells up to two days in advance and store them in an airtight container at room temperature. Just be sure they are completely cooled before storing them. Assemble them closer to serving time to maintain that perfect crispness.
What can I do if my meringue is cracked?
Don’t worry if your meringue shells crack! It’s quite common and doesn’t affect the taste or texture at all. You can even embrace the rustic charm, or simply fill the cracks with extra whipped cream and berries. It will still be incredibly delicious!
Can I use frozen blackberries instead of fresh?
Yes, you can! If using frozen blackberries, thaw them completely and drain off any excess liquid before using them. You might want to gently cook them down into a compote with a touch of sugar for an even more intense flavor.
Blackberry Pavlovas
Delicate meringues topped with a vibrant blackberry compote and luscious whipped cream, creating a delightful dessert.
Ingredients
-
5 egg whites
-
1 1/4 cup granulated sugar
-
A few drops purple food coloring
-
2 tbsp cornstarch
-
2 tsp lemon juice
-
2 cups blackberries
-
1/4 cup sugar
-
2 tbsp lemon juice
-
1 tbsp cornstarch
-
2 tbsp water
-
1 1/2 cups cold heavy cream
-
1/4 cup powdered sugar
-
1 tsp vanilla
Instructions
-
Step 1
Preheat oven to 250°F (120°C). Line a baking sheet with parchment paper and draw a 6-inch circle on it. -
Step 2
In a clean, dry bowl, whisk egg whites until stiff peaks form. Gradually add granulated sugar, one tablespoon at a time, whisking until stiff and glossy. -
Step 3
Gently fold in the purple food coloring, cornstarch, and 2 tsp lemon juice until just combined. Spoon meringue onto the prepared circle, creating a nest shape with slightly higher edges. -
Step 4
Bake for 1 hour and 15 minutes, or until the meringue is crisp to the touch. Turn off the oven and let the meringue cool completely inside with the door slightly ajar. -
Step 5
While the meringue cools, prepare the blackberry compote. Combine blackberries, 1/4 cup sugar, 2 tbsp lemon juice, 1 tbsp cornstarch, and 2 tbsp water in a saucepan. Cook over medium heat, stirring, until thickened. Let cool. -
Step 6
Whip heavy cream with powdered sugar and vanilla until soft peaks form. Spoon the whipped cream into the cooled meringue nests. Top generously with the blackberry compote.
Important Information
Nutrition Facts (Per Serving)
It is important to consider this information as approximate and not to use it as definitive health advice.
Allergy Information
Please check ingredients for potential allergens and consult a health professional if in doubt.