Chocolate Dipped Fruit Cones-Easy Dessert Recipe
Chocolate Dipped Fruit Filled Cones are more than just a dessert; they’re pure joy in every bite! Imagin extracte the satisfying crunch of a perfectly baked cone, yielding to a luscious, creamy fruit filling, all embraced by a decadent shell of rich, melted chocolate. It’s a trifecta of textures and flavors that instantly transports you to a happy place, conjuring memories of carefree summer days and delightful celebrations. What makes these chocolate dipped fruit filled cones so utterly irresistible? It’s the delightful contrast between the crisp exterior and the soft, bursting sweetness within, elevated by the luxurious embrace of chocolate. They offer a sophisticated yet playful twist on classic ice cream cones, making them perfect for a special occasion or simply a moment of personal indulgence.
Why You’ll Love Them:
Effortless Elegance: These treats look and taste gourmet with surprisingly little effort.
Customizable Delight: Experiment with your favorite fruits and chocolate pairings.
Guaranteed Crowd-Pleaser: From kids to adults, everyone adores these delightful creations.

Chocolate Dipped Fruit Filled Cones
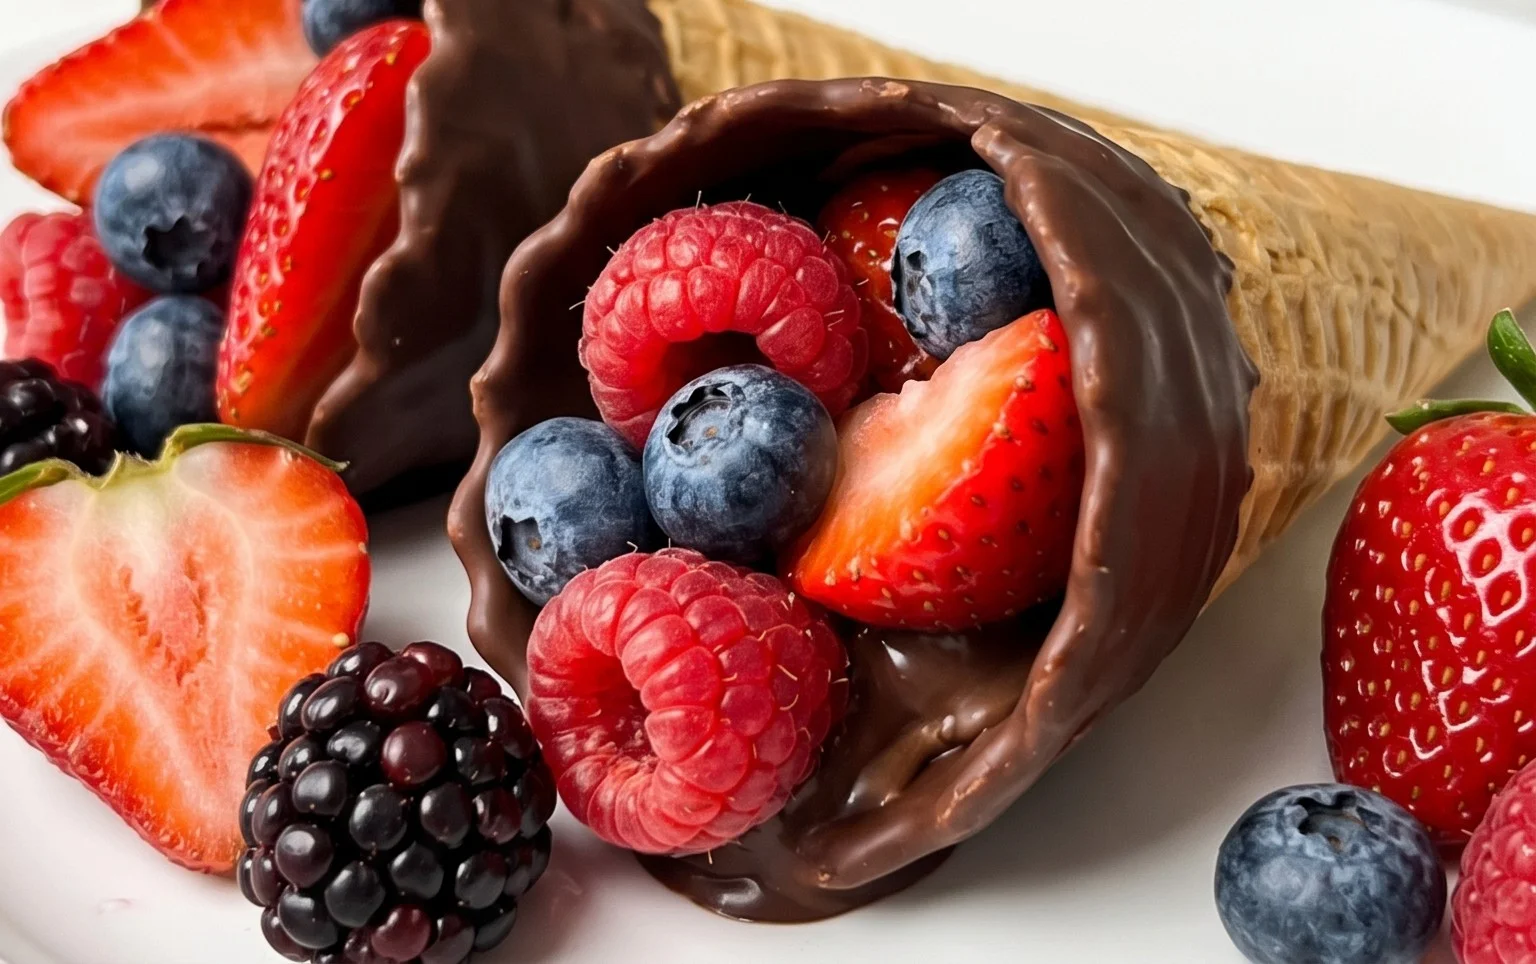
This recipe for Chocolate Dipped Fruit Filled Cones is a delightful treat that combines the crispy crunch of an ice cream cone with the sweet burst of fresh fruit and the decadent richness of chocolate. It’s a wonderfully versatile dessert that can be customized to your heart’s content, making it perfect for parties, a special occasion, or even just a fun afternoon activity with the kids. Forget the plain old ice cream cone; we’re elevating it to a whole new level of deliciousness!
The beauty of these cones lies in their simplicity and the ability to use whatever fruits are in season or your personal favorites. Imagin extracte biting into a crispy waffle cone, followed by a layer of fluffy whipped cream, the vibrant tang of fresh berries, and finally, the satisfying snap of melted chocolate. It’s a symphony of textures and flavors that will leave you wanting more. Let’s get started on creating these showstopping treats!
Ingredients:
Preparing Your Delicious Cones
The first step in creating these delightful treats is to get all your components ready. This prep work ensures a smooth and enjoyable assembly process.
Whipping the Cream
In a chilled mixing bowl, combine the heavy whipping cream, powdered sugar, and vanilla extract. Using an electric mixer on medium-high speed, whip the cream until stiff peaks form. This means that when you lift the beaters out of the cream, the peaks will stand straight up without drooping. Be careful not to over-whip, as this can turn your cream into butter! If you don’t have an electric mixer, you can certainly achieve this by hand with a whisk, but it will require a bit more effort and patience. Once whipped, cover the bowl and refrigerate the cream while you prepare the other elements. This keeps it nice and cold, which is crucial for a good whipped cream.
Fruit Preparation
Next, we move on to the stars of our filling: the fresh fruits. Wash all your fruits thoroughly and pat them dry. For larger fruits like strawberries, hull them and then slice them into bite-sized pieces. If you’re using bananas, slice them just before you’re ready to assemble to prevent them from browning. Mandarin oranges can be segmented, and kiwi can be peeled and sliced. The key here is to have your fruits ready to go so they can be layered into the cones without delay. Having a colorful assortment not only looks beautiful but also offers a variety of flavors and textures.
Melting the Chocolate
Now, let’s prepare the chocolate coating. Place the chocolate chips in a microwave-safe bowl. If you’re using coconut oil or vegetable oil, add it now. This oil helps to thin out the chocolate, making it easier to dip and giving it a smoother, glossier finish. Microwave the chocolate in 30-second intervals, stirring well after each interval, until the chocolate is completely melted and smooth. Alternatively, you can melt the chocolate using a double boiler. Place the chocolate chips (and oil, if using) in a heatproof bowl set over a saucepan of simmering water, ensuring the bottom of the bowl doesn’t touch the water. Stir constantly until melted and smooth. Once melted, set the chocolate aside to cool slightly. It should still be warm and pourable, but not hot enough to melt the cream.
Assembling Your Chocolate Dipped Fruit Filled Cones
With all our components prepped and ready, it’s time for the most exciting part: assembling these beautiful cones!
1. Layer the Fruit: Begin extract by spooning a layer of your prepared fresh fruit into the bottom of each waffle cone. Don’t overfill them at this stage; we need space for the whipped cream. Aim for a single, even layer. The fruits at the bottom will provide a delicious base for the cream and the rest of the cone’s filling.
2. Add the Whipped Cream: Carefully spoon or pipe a generous dollop of the chilled whipped cream over the fruit in each cone. You can use a spoon for a rustic look or a piping bag with a star tip for a more elegant presentation. Make sure to fill the cone almost to the brim with the whipped cream. The cream acts as a binder and a luscious contrast to the fruit and cone.
3. Add More Fruit: Now, artfully arrange more of your fresh fruit on top of the whipped cream. This is where you can really get creative with your presentation. Think about color combinations and textures. A few raspberries and a slice of kiwi can look absolutely stunning. This second layer of fruit adds visual appeal and another burst of flavor.
4. The Chocolate Dip: This is the grand finnon-alcoholic ale! Take your slightly cooled melted chocolate and carefully drizzle it over the top of each filled cone. You can either drizzle it in a zig-zag pattern, letting it cascade down the sides of the whipped cream and fruit, or you can hold the cone upside down and dip the very top edge into the melted chocolate for a more defined chocolate rim. If you’re aiming for a full chocolate coating, you would carefully dip the entire cone, but for this recipe, we’re focusing on a beautiful, artful drizzle.
5. Chill and Serve: Once decorated with chocolate, carefully place the cones on a baking sheet lined with parchment paper. If the chocolate seems to be setting too quickly, you can pop them in the refrigerator for about 10-15 minutes to allow the chocolate to fully harden and set. This step is crucial for ensuring the chocolate coating stays in place and the cones are easy to handle. Serve immediately and enjoy the delightful combination of crunchy cone, creamy filling, fresh fruit, and rich chocolate! These are best enjoyed right after they’re made for optimal texture.
Conclusion:
And there you have it! This Chocolate Dipped Fruit Filled Cone recipe is truly a delight. It strikes the perfect balance between a satisfying crunch from the cone, the luxurious richness of chocolate, and the refreshing burst of fresh fruit. It’s a wonderfully versatile treat that’s surprisingly easy to make, perfect for impressing guests or simply indulgin extractg yourself. I find them ideal for parties, afternoon snacks, or even a light dessert after a meal. The beauty of these cones lies in their adaptability, allowing you to customize them to your heart’s content.
Don’t hesitate to experiment with different fruit combinations – think berries and cream, tropical mango and pineapple, or even a zesty citrus medley. You can also play around with the chocolate; milk, dark, or white chocolate all offer a distinct flavor profile. For an added touch, consider a sprinkle of nuts, shredded coconut, or edible glitter before the chocolate sets. I truly encourage you to give these Chocolate Dipped Fruit Filled Cones a try; they’re guaranteed to bring smiles and satisfied sighs all around. Get creative and enjoy every delicious bite!
Frequently Asked Questions:
Can I make these Chocolate Dipped Fruit Filled Cones ahead of time?
Yes, you absolutely can! I recommend assembling and dipping them a few hours before serving. Store them in an airtight container in the refrigerator to keep them fresh and prevent the chocolate from melting. Just be aware that very juicy fruits might soften the cone slightly over longer periods.
What is the best way to store leftover cones?
If you happen to have any leftovers, the best way to store them is in a single layer in an airtight container in the refrigerator. This will help maintain the crispness of the cone and prevent the chocolate from becoming sticky or melting. Enjoy them within a day or two for the best texture.
Chocolate Dipped Fruit Filled Cones
A delightful dessert featuring crispy cones filled with fresh fruit and dipped in rich chocolate.
Ingredients
-
1 cup all-purpose flour
-
1/2 cup granulated sugar
-
1/4 cup unsalted butter, melted
-
1 large egg
-
1/2 cup milk
-
1 teaspoon vanilla extract
-
1 cup fresh berries (strawberries, blueberries, raspberries)
-
1/2 cup chopped fresh pineapple
-
4 ounces semi-sweet chocolate chips
-
1 tablespoon coconut oil
Instructions
-
Step 1
Preheat oven to 350°F (175°C). Grease and flour a waffle cone maker or two baking sheets. -
Step 2
In a medium bowl, whisk together flour and sugar. In a separate bowl, whisk together melted butter, egg, milk, and vanilla extract. -
Step 3
Gradually add the wet ingredients to the dry ingredients, whisking until just combined. Do not overmix. -
Step 4
Pour about 2 tablespoons of batter onto the prepared waffle cone maker or a baking sheet and spread thinly. Bake for 5-7 minutes, or until golden brown. -
Step 5
Quickly shape the warm cone into a cone shape using a cone mold or by hand. Repeat with remaining batter. -
Step 6
While cones are cooling, prepare the fruit filling by gently mixing the fresh berries and chopped pineapple. -
Step 7
In a microwave-safe bowl, combine semi-sweet chocolate chips and coconut oil. Microwave in 30-second intervals, stirring between each, until smooth and melted. -
Step 8
Fill the cooled cones with the fruit mixture. Dip the filled cones into the melted chocolate, allowing excess to drip off. -
Step 9
Place the chocolate-dipped cones on a parchment-lined baking sheet and refrigerate for at least 15 minutes, or until the chocolate is set.
Important Information
Nutrition Facts (Per Serving)
It is important to consider this information as approximate and not to use it as definitive health advice.
Allergy Information
Please check ingredients for potential allergens and consult a health professional if in doubt.