Crispy Baked Zucchini Chips Recipe
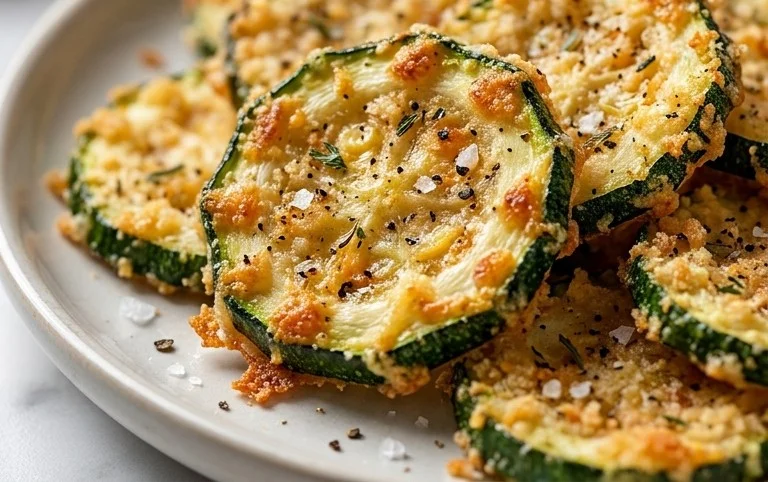
Baked zucchini chips are the ultimate guilt-free snack, and I’m here to tell you why you absolutely need to add them to your repertoire. Forget those oily, deep-fried alternatives; these delightful morsels offer a satisfying crunch with none of the heaviness. I find myself reaching for a batch of baked zucchini chips time and time again when that craving for something savory and crispy hits. They’re wonderfully light, allowing the subtle, slightly sweet flavor of the zucchini to shine through. What truly makes these baked zucchini chips so special is their incredible versatility. Serve them as a healthy appetizer for guests, a delightful side dish for lunch, or simply munch on them straight from the oven while catching up on your favorite show. The simplicity of preparation, coupled with the fantastic flavor and texture, is what makes these baked zucchini chips a true winner in my kitchen.

Baked Zucchini Chips
Forget the greasy, deep-fried versions of your favorite crunchy snacks. We’re about to unlock the secret to guilt-free, incredibly delicious baked zucchini chips that will have you reaching for more before you even realize it. This recipe is so simple, so satisfying, and a fantastic way to use up those garden-fresh zucchinis or grab a couple from the grocery store. They’re perfect as a light appetizer, a healthy side dish, or even a crunchy addition to salads. The beauty of this recipe lies in its simplicity and the amazing transformation of humble zucchini into a crispy, flavorful delight.
Ingredients:
Instructions:
Preparation is Key
The first and most crucial step to achieving perfectly crispy zucchini chips is proper preparation of the zucchini itself. You want to start with two medium-sized zucchini. The size matters here, as larger zucchini can sometimes have a higher water content, which can lead to soggy chips. Select firm, unblemished zucchini for the best results. Now, for the slicing: the key is to get consistent thickness. Aim for rounds that are about 4-5 millimeters thick. A mandoline slicer is your best friend here, ensuring uniform slices. If you don’t have a mandoline, a sharp knife and a steady hand will do the trick. Just take your time and try to make them as even as possible. This evenness is vital because it allows all the chips to cook at the same rate, preventing some from burning while others remain undercooked.
Once your zucchini is sliced into those perfect rounds, we need to tackle the moisture. Zucchini is notoriously watery, and excess moisture is the enemy of crispiness. So, after you’ve sliced them, lay them out in a single layer on paper towels. Sprinkle them lightly with a little bit of your salt. Let them sit for about 10-15 minutes. You’ll notice beads of moisture forming on the surface. Gently pat them dry with more paper towels, pressing down to absorb as much liquid as possible. This step is non-negotiable for achieving that delightful crunch! Don’t be shy about this drying process; the drier the zucchini slices, the crispier your chips will be.
Seasoning for Flavor Explosion
Now that our zucchini is prepped and ready, it’s time to get creative with flavor! In a medium bowl, whisk together the olive oil, grated Parmesan cheese, garlic powder, paprika, and the remaining salt. If you’re feeling adventurous and want a little kick, this is also a great time to add your black pepper. Mix everything thoroughly until you have a lovely, fragrant paste. The Parmesan cheese will help create a wonderful golden-brown crust as it bakes, while the garlic powder and paprika add a savory depth that complements the mild sweetness of the zucchini perfectly.
Now, gently add your dried zucchini slices to the bowl with the seasoning mixture. Using your hands or a spatula, carefully toss the zucchini slices to ensure each piece is evenly coated. You want to make sure every single slice gets a good dose of that delicious cheesy, savory goodness. Be gentle so you don’t break the delicate slices. It’s better to have a slightly less coated chip than a broken one.
Baking to Perfection
Preheat your oven to 400 degrees Fahrenheit (200 degrees Celsius). This higher temperature is crucial for achieving crispiness. Line two large baking sheets with parchment paper. Parchment paper is highly recommended as it prevents sticking and makes clean-up a breeze. Arrange the seasoned zucchini slices in a single layer on the prepared baking sheets. It’s absolutely essential that the slices are not overlapping. If they are crowded, they will steam instead of bake, resulting in soggy chips. You might need to use more than two baking sheets, or bake in batches, to ensure adequate spacing. Give them a little breathing room, and they will reward you with their crispiness.
The Waiting Game (and the Reward!)
Place the baking sheets in the preheated oven and bake for 10-15 minutes. Keep a close eye on them! The baking time can vary depending on your oven and the thickness of your zucchini slices. After about 10 minutes, carefully flip each chip using a spatula or tongs. Continue to bake for another 5-10 minutes, or until the edges are golden brown and the chips are crispy. They should feel firm to the touch. If you notice some browning faster than others, you can carefully remove them from the baking sheet to prevent burning. The goal is a beautiful, even golden crispness across all your chips.
Once they’re done, remove the baking sheets from the oven. Let the zucchini chips cool on the baking sheets for a few minutes. As they cool, they will continue to crisp up. Transfer them to a wire rack to cool completely. This cooling step is important for achieving maximum crispiness. Enjoy your homemade baked zucchini chips immediately for the best texture, or store them in an airtight container at room temperature for a day or two, though they are undeniably best when fresh out of the oven. They are a fantastic way to enjoy a healthy, flavorful, and satisfying snack.
Conclusion:
So there you have it – your ultimate guide to creating delicious and incredibly easy baked zucchini chips! I truly hope you give this recipe a try. It’s such a fantastic way to enjoy a healthy snack that’s bursting with flavor and wonderfully crisp. These baked zucchini chips are a game-changer because they’re guilt-free, adaptable, and surprisingly simple to master, making them perfect for begin extractners and seasoned cooks alike. Imagin extracte impressing your friends and family with a homemade treat that’s both delightful and nutritious!
Beyond just snacking on them straight from the oven, these chips are incredibly versatile. They make a superb accompaniment to sandwiches or wraps, adding a satisfying crunch. You can also crum extractble them over salads for an unexpected textural element, or serve them as a light appetizer alongside your favorite dips, like hummus, ranch, or a spicy aioli. For even more flavor adventures, don’t hesitate to experiment with different seasonings. Think smoky paprika, garlic powder, onion powder, or even a sprinkle of Parmesan cheese before baking for an Italian twist. The possibilities are truly endless, allowing you to customize them to your exact taste preferences. I’m so excited for you to experience how amazing these baked zucchini chips are!
Frequently Asked Questions:
How do I ensure my zucchini chips are crispy and not soggy?
The key to crispy baked zucchini chips is to properly prepare the zucchini. After slicing, it’s crucial to salt the zucchini and let it sit for about 15-30 minutes. This process draws out excess moisture. Then, thoroughly pat them dry with paper towels before seasoning and baking. Ensure they have enough space on the baking sheet so they aren’t overcrowded, and consider flipping them halfway through baking for even crisping.
Can I make these zucchini chips ahead of time?
While they are best enjoyed fresh from the oven for optimal crispness, you can bake them a few hours in advance. Allow them to cool completely on a wire rack. Store them in an airtight container at room temperature. They will lose some crispness over time, but can still be enjoyed. If you want to re-crisp them, a short stint in a preheated oven (around 300°F or 150°C) for 5-10 minutes usually does the trick.
What if I don’t have a mandoline slicer?
No worries at all! You can absolutely achieve thin, uniform slices with a sharp knife. Take your time to ensure the slices are as consistent in thickness as possible. This will help them bake evenly. A ruler can be a handy tool to measure your slices if you want to be extra precise, but it’s not strictly necessary for delicious results.
Baked Zucchini Chips
Crispy and flavorful baked zucchini chips, a healthy alternative to fried snacks.
Ingredients
-
2 medium zucchini (sliced into rounds (4-5 mm thickness))
-
1/4 cup olive oil
-
2/3 cup grated parmesan cheese
-
1/2 tsp garlic powder
-
1/4 tsp paprika
-
1/2 tsp salt
-
black pepper to taste
Instructions
-
Step 1
Preheat oven to 400°F (200°C). Line two baking sheets with parchment paper. -
Step 2
In a large bowl, toss the zucchini slices with olive oil until evenly coated. -
Step 3
In a separate shallow dish, combine the grated parmesan cheese, garlic powder, paprika, salt, and black pepper. -
Step 4
Dredge each zucchini slice in the cheese mixture, ensuring both sides are well coated. -
Step 5
Arrange the coated zucchini slices in a single layer on the prepared baking sheets, making sure they do not overlap. -
Step 6
Bake for 10-12 minutes per side, or until golden brown and crispy. Flip halfway through for even cooking. -
Step 7
Let cool slightly before serving.
Important Information
Nutrition Facts (Per Serving)
It is important to consider this information as approximate and not to use it as definitive health advice.
Allergy Information
Please check ingredients for potential allergens and consult a health professional if in doubt.