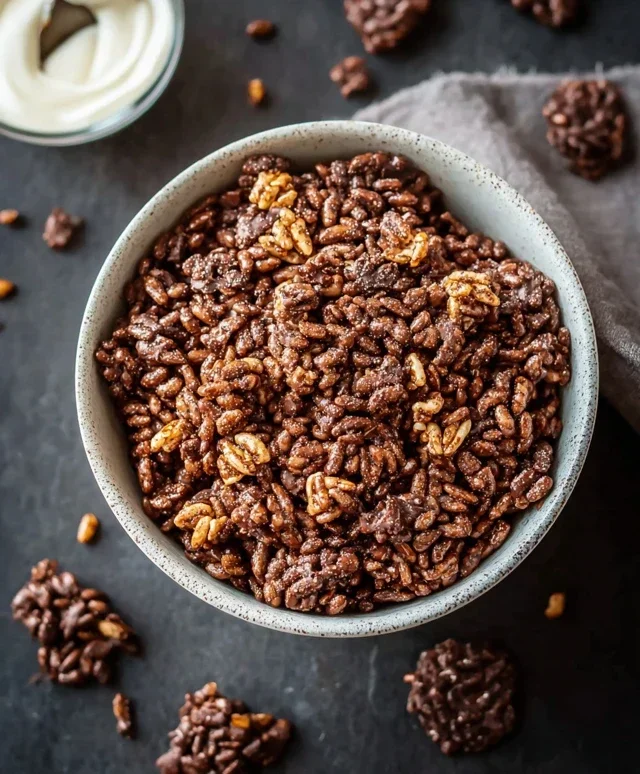
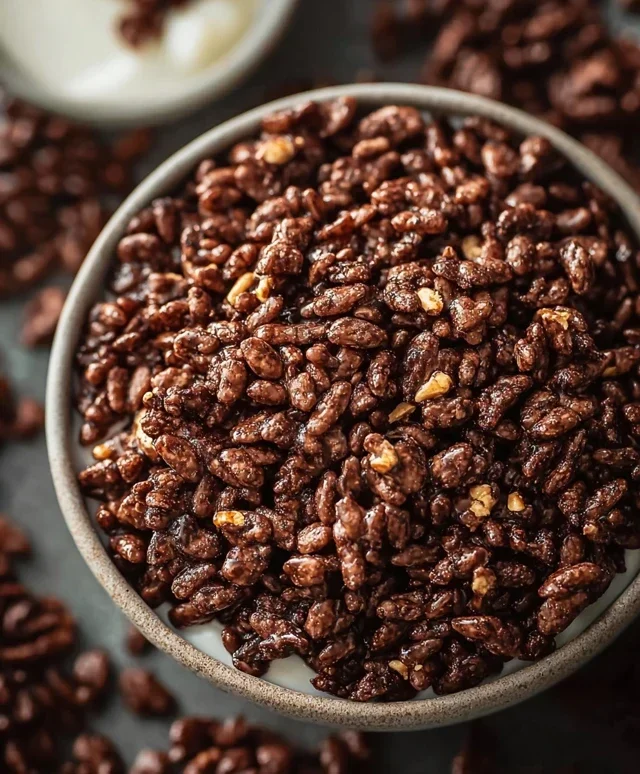
Healthy Crispy Chocolate Puffed Rice Cereal Recipe
Healthy Crispy Chocolate Puffed Rice Cereal is about to become your new go-to breakfast obsession! Are you tired of the sugary cereals that leave you crashing by mid-morning? Do you crave that satisfying crunch and decadent chocolate flavor, but want to feel good about what you’re eating? Then get ready to fall in love with this incredibly simple yet utterly delightful recipe. We’ve all been there – reaching for that familiar box, only to be met with a pang of guilt. But what if I told you that you can have all the joy of a classic crispy chocolate puffed rice cereal, without any of the processed ingredients or excessive sugar? This version is a game-changer, offering a wonderfully satisfying texture and a rich, satisfying chocolate taste that will have everyone asking for seconds. It’s proof that healthy eating doesn’t have to mean sacrificing deliciousness. Get ready to upgrade your mornings with our Healthy Crispy Chocolate Puffed Rice Cereal!
Ingredients:
Crafting Your Own Healthy Crispy Chocolate Puffed Rice Cereal
Tired of the sugar-laden breakfast cereals lining the supermarket shelves? Do you crave that satisfying crunch and rich chocolate flavor without the guilt? Well, get ready to transform your mornings with this incredibly simple yet utterly delicious recipe for Healthy Crispy Chocolate Puffed Rice Cereal. This is one of those recipes that feels like a treat but is actually packed with wholesome goodness. Imagin extracte a cereal that’s naturally sweetened, free from artificial flavors and colors, and delivers that satisfying crispy texture you love. Making your own cereal not only gives you complete control over the ingredients but also the delightful satisfaction of creating something wonderful from scratch. It’s perfect for a quick breakfast on busy weekdays, a satisfying snack, or even a healthy dessert base. Let’s dive into how easy it is to make this delightful treat right in your own kitchen.
Getting Started: Prepping Your Workspace
Before we embark on our culinary adventure, let’s ensure we have everything ready to go. The beauty of this recipe lies in its simplicity, so there’s minimal fuss involved. You’ll want a large mixing bowl, a saucepan for melting, a whisk or spoon for stirring, and a baking sheet lined with parchment paper. Lining your baking sheet is crucial for easy cleanup, and it prevents the cereal from sticking. Having your puffed rice measured out and ready to go will make the process flow smoothly. Also, if your coconut oil is solid, gently warm it until it’s in a pourable liquid state. This ensures it mixes evenly with the other wet ingredients.
The Chocolatey Goodness: Creating the Coating
Now for the star of the show – the rich, decadent chocolate coating! This is where the magic happens. In a small saucepan, we’re going to gently melt the coconut oil. Place the saucepan over low heat. We don’t want to overheat or burn the coconut oil, so keep the heat very gentle. Once the coconut oil is fully liquid, it’s time to whisk in the raw cacao powder. This is the ingredient that gives our cereal its deep, natural chocolate flavor and beautiful color. Whisk continuously until there are no lumps of cacao powder remaining, creating a smooth, glossy chocolate mixture.
Next, we’ll introduce the natural sweetness. Add the maple syrup to the warm chocolate mixture. The amount of maple syrup can be adjusted to your personal preference. If you like things a little sweeter, feel free to add an extra tablespoon. If you prefer a more subtle chocolate flavor, you can slightly reduce it. Whisk everything together until it’s well combined and the mixture is uniform. Finally, for that extra hint of warmth and depth, add the vanilla extract. Give it one last good whisk. This creates our luscious, healthy chocolate coating that will transform plain puffed rice into an irresistible cereal.
Combining and Coating: Bringin extractg It All Together
With our chocolate mixture ready, it’s time to bring it together with the star of the show: the puffed rice. Pour the 4 cups of puffed rice into your large mixing bowl. Now, it’s time to pour our warm, luscious chocolate mixture over the puffed rice. The key here is to coat the puffed rice as evenly as possible. You can use a spatula or a large spoon to gently fold and stir the puffed rice, ensuring each and every piece gets a good coating of the chocolate mixture. Be gentle so you don’t crush the delicate puffed rice. Take your time with this step; the more thoroughly you coat the rice, the more delicious and chocolatey your cereal will be. Imagin extracte each crunchy puff being enveloped in this rich, chocolatey goodness – it’s quite a satisfying process to watch.
The Crisping Phase: Achieving That Perfect Crunch
Once all the puffed rice is coated, it’s time to get it nice and crispy. Carefully spread the coated puffed rice in an even layer onto the prepared baking sheet. Try to spread it out so there aren’t too many clumps. This allows for even drying and crisping. You can gently break apart any large clumps with your fingers if needed. The goal is to have a single layer so that the air can circulate around each piece of cereal, helping it to dry out and become perfectly crisp.
Now, we’re going to bake these in a preheated oven. Preheat your oven to a low temperature, around 250 degrees Fahrenheit (120 degrees Celsius). Low and slow is the key to achieving crispness without burning the delicate ingredients. Place the baking sheet in the oven and let it bake for approximately 20-30 minutes. During this time, you’ll want to stir the cereal every 10 minutes or so. This is crucial for ensuring even drying and preventing any parts from getting too brown. You’ll notice the cereal starting to feel lighter and more brittle as it bakes. Keep an eye on it, as it can go from perfectly crisp to burnt very quickly. You’re looking for a dry, crunchy texture.
Cooling and Storing: Enjoying Your Creation
Once the cereal has reached your desired level of crispness, carefully remove the baking sheet from the oven. Let the cereal cool completely on the baking sheet. It might not feel entirely crisp when it’s warm, but as it cools down, it will develop that satisfying crunch. Resist the temptation to dig in immediately! Patience is rewarded here. Once completely cool, you can gently break apart any larger pieces that may have stuck together during baking.
Store your homemade Healthy Crispy Chocolate Puffed Rice Cereal in an airtight container at room temperature. When stored properly, it should stay wonderfully crisp for about a week. Enjoy it with your favorite milk (dairy or non-dairy), sprinkle it over yogurt, or simply eat it by the handful as a guilt-free snack. This recipe is a fantastic starting point, and you can experiment with adding other ingredients like a pinch of cinnamon or some unsweetened shredded coconut to the mix for extra flavor dimensions. Enjoy your healthy, homemade breakfast!
Conclusion:
I hope you’ve enjoyed learning how to make this incredibly satisfying and healthy crispy chocolate puffed rice cereal! It’s truly a game-changer for anyone looking for a delicious breakfast or snack that doesn’t compromise on taste or nutrition. The simplicity of the ingredients, combined with the delightful crunch and rich chocolate flavor, makes this recipe a winner. You get all the satisfaction of a classic crispy cereal without the refined sugars and artificial additives. It’s a recipe that’s both fun to make and even more fun to eat, offering a guilt-free way to indulge your sweet cravings.
I love serving this cereal with a splash of your favorite plant-based milk for a quick breakfast, or as a topping for yogurt parfaits. For a more substantial snack, consider adding a handful of fresh berries or a sprinkle of chopped nuts. Don’t be afraid to get creative with variations! You could add a touch of cinnamon for warmth, a pinch of chili powder for a surprising kick, or even some freeze-dried fruit for extra color and texture. Give this recipe a try – I’m confident you’ll be delighted with the results and find yourself making it again and again!
Frequently Asked Questions:
How can I make this cereal even healthier?
To boost the health factor, consider using a darker cocoa powder for a more intense chocolate flavor with less sugar. You can also incorporate finely chopped nuts or seeds like chia seeds or flaxseeds into the mixture for added fiber and healthy fats. If you find puffed rice alone a bit plain, try using puffed quinoa or a mixed grain cereal for a more complex nutritional profile.
Can I store this cereal for a long time?
Absolutely! Once completely cooled, store your healthy crispy chocolate puffed rice cereal in an airtight container at room temperature. It should stay delightfully crispy for up to two weeks. Ensure there’s no moisture introduced, as this can lead to soggin extractess.
Is this recipe suitable for kids?
Yes, this recipe is fantastic for kids! It’s a wonderful way to introduce them to healthier breakfast options, and they often love helping to mix the ingredients. You can adjust the amount of cocoa and sweetener to suit their palates. Just supervise younger children during the preparation process, especially around any warm ingredients.
Healthy Crispy Chocolate Puffed Rice Cereal
A quick and healthy homemade cereal alternative with a satisfying chocolatey crunch.
Ingredients
-
4 cups of puffed rice
-
4 tbsp of coconut oil (liquid)
-
3 tbsp of raw cacao
-
2 tbsp of maple syrup
-
1/4 tsp of vanilla extract
-
Pinch of salt
Instructions
-
Step 1
Gently melt the coconut oil in a small saucepan over low heat. -
Step 2
In a large bowl, combine the melted coconut oil, raw cacao, maple syrup, vanilla extract, and a pinch of salt. Whisk until smooth and well combined. -
Step 3
Add the puffed rice to the chocolate mixture. Stir gently but thoroughly until all the puffed rice is evenly coated. -
Step 4
Spread the coated puffed rice in a single layer onto a baking sheet lined with parchment paper. -
Step 5
Bake in a preheated oven at 300°F (150°C) for 10-12 minutes, stirring halfway through, until lightly toasted and crispy. -
Step 6
Let the cereal cool completely on the baking sheet before breaking it apart into clusters. Store in an airtight container.
Important Information
Nutrition Facts (Per Serving)
It is important to consider this information as approximate and not to use it as definitive health advice.
Allergy Information
Please check ingredients for potential allergens and consult a health professional if in doubt.