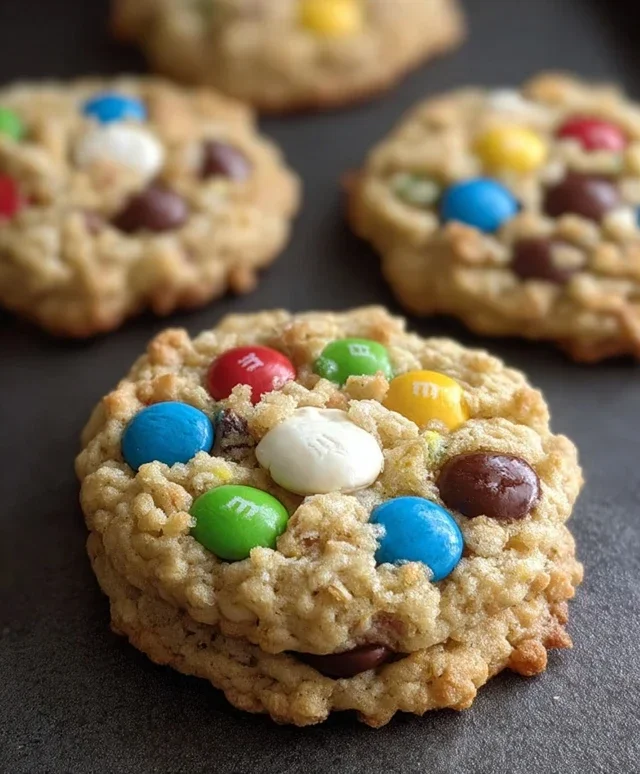
M&M Rice Krispies Cookies- Chewy Easy Treat
M&M Rice Krispies Cookies are about to become your new favorite treat, and I’m so excited to share this recipe with you! Forget everything you thought you knew about classic Rice Krispies treats, because we’re elevating them into something truly magical. These aren’t just a simple snack; they’re a delightful explosion of textures and flavors that bring out the inner child in everyone. Imagin extracte the satisfying crunch of puffed rice cereal, the gooey, marshmallowy chegrape juicess you adore, all studded with the iconic, colorful candy-coated chocolate gems of M&Ms. What makes M&M Rice Krispies Cookies so incredibly special is their perfect balance: the familiar comfort of a childhood favorite gets a playful, irresistible upgrade. They’re incredibly easy to make, making them ideal for a quick dessert craving or a fun activity with family. Prepare for smiles and requests for seconds – these M&M Rice Krispies Cookies are a guaranteed hit!

M&M Rice Krispies Cookies
Get ready for a cookie experience that’s out of this world! We’re taking two beloved classics – M&M cookies and Rice Krispies treats – and mergin extractg them into one spectacularly chewy, crispy, and utterly delightful cookie. These M&M Rice Krispies Cookies are a textural wonderland, offering that satisfying crunch from the cereal alongside the gooey chew of a perfectly baked cookie, all studded with colorful M&M’s and rich chocolate chips. They’re incredibly easy to make, making them a fantastic choice for a weekend baking project with kids or just a delightful treat for yourself. Trust me, once you try these, they’ll become a new staple in your cookie repertoire.
Ingredients:
Instructions:
Phase 1: Browning the Butter and Mixing the Wet Ingredients
The secret to an extra-deep, caramel-like flavor in these cookies is browning the butter. Start by placing your 1/2 cup of unsalted butter in a light-colored saucepan over medium heat. Watch it closely as it melts. It will foam up, and then you’ll start to see little brown bits forming at the bottom of the pan. Swirl the pan occasionally. You’re looking for a nutty aroma and a rich, golden-brown color. Once it reaches this stage, immediately remove it from the heat to prevent it from burning. Pour the browned butter into a large mixing bowl and let it cool for about 5-10 minutes. This step is crucial; you don’t want to scramble your egg!
Once the browned butter has cooled slightly, add your 1/2 cup + 2 tablespoons of packed brown sugar and 2 tablespoons of granulated sugar to the bowl. Whisk these together until they are well combined with the butter. Next, add your room-temperature large egg and 1 teaspoon of vanilla extract. Whisk vigorously until the mixture is smooth and emulsified. Room temperature eggs incorporate more easily and create a lighter texture in your cookies. If you forget to take your egg out in advance, you can place it in a bowl of warm water for about 5-10 minutes to bring it to room temperature quickly.
Phase 2: Incorporating the Dry Ingredients and the Fun Stuff
In a separate medium bowl, whisk together your 1 1/3 cups of all-purpose flour, 1/2 teaspoon of baking soda, and 1/4 teaspoon of salt. This ensures that your leavening agent and salt are evenly distributed throughout the dry ingredients, preventing pockets of bitterness or uneven rising in your cookies. Now, gradually add the dry ingredients to the wet ingredients in your large mixing bowl. Mix on low speed or stir with a spatula until just combined. Be careful not to overmix at this stage; overmixing can develop the gluten in the flour, leading to tougher cookies.
Now for the best part: the mix-ins! Gently fold in your 2/3 cup of mini M&M’s and 1/3 cup of semisweet chocolate chips. Reserve a few M&M’s and chocolate chips for pressing onto the tops of the cookies before baking, if you like a pretty presentation. Finally, add the 1/4 cup of Rice Krispies cereal. Stir everything together until it’s evenly distributed throughout the dough. The Rice Krispies will add a delightful crispness to the cookie.
Phase 3: Creating the Marshmallow-Cereal Clusters
This is where the “Rice Krispies Treat” magic truly comes in! In a small, microwave-safe bowl, combine your 6 marshmallows with about 1 tablespoon of the remaining unsalted butter (you can melt this separately or just add a little bit to the marshmallows). Microwave on high for about 30 seconds, or until the marshmallows are puffed up and melted. Stir them until they are smooth and glossy. Be cautious as the marshmallows will be very hot. Immediately stir in the 1/3 cup of Rice Krispies cereal that you set aside. Mix quickly until the cereal is well coated. This will create little chewy, crispy clusters that we’ll incorporate into the cookie dough. Let this mixture cool slightly for a minute or two so it doesn’t melt the M&M’s and chocolate chips too much when you combine them.
Phase 4: Assembling and Baking the Cookies
Preheat your oven to 350°F (175°C). Line baking sheets with parchment paper or silicone baking mats. This prevents sticking and makes for easy cleanup. Now, take about 1-2 tablespoons of your cookie dough and flatten it slightly in your palm. Place a small spoonful of the slightly cooled marshmallow-Rice Krispies mixture into the center of the flattened dough. Then, carefully fold the dough around the marshmallow mixture, shaping it into a ball. You don’t need to perfectly enclose it; some of the marshmallow mixture peeking out is part of the charm! Place the cookie dough balls onto your prepared baking sheets, leaving about 2 inches between each cookie to allow for spreading. If you reserved extra M&M’s and chocolate chips, gently press them onto the tops of the cookie dough balls now for an extra decorative touch.
Bake for 10-12 minutes, or until the edges are golden brown and the centers are still slightly soft. The marshmallows will puff up and likely ooze out a bit – this is exactly what we want! They will continue to set as they cool. Let the cookies cool on the baking sheets for at least 5 minutes before transferring them to a wire rack to cool completely. This resting period is important for them to firm up properly. Enjoy these incredibly fun and delicious M&M Rice Krispies Cookies warm with a glass of milk, or once they’ve cooled to room temperature. They are a fantastic treat that brings together the best of both worlds!
Conclusion:
There you have it! These M&M Rice Krispies Cookies are an absolute triumph of simple ingredients and delightful textures. They’re incredibly easy to make, making them perfect for bakers of all skill levels and a fantastic activity to share with family or friends. The satisfying crunch of the Rice Krispies, combined with the chewy cookie base and the bursts of chocolatey goodness from the M&Ms, creates a flavor and texture sensation that’s hard to resist. They’re the ultimate treat for a casual afternoon snack, a potluck, or even a fun birthday party dessert.
I love serving these warm, straight from the oven, for that extra gooey chocolate experience, but they’re equally delicious at room temperature. Consider crum extractbling them over ice cream for an instant sundae upgrade, or use them as the base for a no-bake pie crust. For variations, don’t be afraid to experiment! Swap out the M&Ms for chocolate chips, add a sprinkle of sea salt for a salty-sweet contrast, or even fold in some chopped nuts for added crunch. I truly encourage you to give these M&M Rice Krispies Cookies a try. I’m confident you’ll love them as much as I do!
Frequently Asked Questions:
Can I make these cookies ahead of time?
Absolutely! These cookies store very well. Once completely cooled, place them in an airtight container at room temperature. They should stay fresh and delicious for up to 3-4 days, though I doubt they’ll last that long!
What’s the best way to store M&M Rice Krispies Cookies?
For optimal freshness, store your M&M Rice Krispies Cookies in an airtight container. If you live in a very warm climate, you might want to place a small piece of parchment paper between layers to prevent them from sticking together, especially if the chocolate M&Ms might soften slightly.
Are there any nut-free variations?
Yes! The base recipe itself is nut-free, assuming your M&Ms and other ingredients are nut-free. If you’re looking to avoid nuts due to allergies, simply omit any nut additions mentioned in the variations section. Always double-check the packagin extractg of your ingredients for any hidden nut warnings.
M&M Rice Krispies Cookies
Chewy and crispy cookies packed with M&M’s, chocolate chips, and Rice Krispies for a fun textural contrast.
Ingredients
-
1/2 cup unsalted butter, for browning
-
1/2 cup + 2 tablespoons packed brown sugar
-
2 tablespoons granulated sugar
-
1 large egg, room temperature
-
1 teaspoon vanilla extract
-
1 1/3 cups all-purpose flour, spoon and leveled
-
1/2 teaspoon baking soda
-
1/4 teaspoon salt
-
2/3 cup mini M&M’s, plus more for garnish
-
1/3 cup semisweet chocolate chips, plus more for garnish if desired
-
1/4 cup Rice Krispies cereal
-
6 marshmallows
-
1/3 cup Rice Krispies cereal, set aside for topping
Instructions
-
Step 1
Melt the butter in a saucepan over medium heat. Continue cooking, stirring occasionally, until the butter turns a nutty brown color and smells fragrant. Remove from heat and carefully pour into a heatproof bowl. -
Step 2
To the browned butter, add the packed brown sugar and granulated sugar. Whisk until well combined. -
Step 3
Whisk in the egg and vanilla extract until smooth. Stir in the flour, baking soda, and salt until just combined. -
Step 4
Fold in the mini M&M’s, chocolate chips, 1/4 cup Rice Krispies cereal, and marshmallows until evenly distributed. -
Step 5
Drop rounded tablespoons of dough onto a parchment-lined baking sheet, leaving about 2 inches between cookies. Sprinkle the reserved 1/3 cup Rice Krispies cereal on top of each cookie. Flatten slightly with your palm or the bottom of a glass. -
Step 6
Bake at 350°F (175°C) for 10-12 minutes, or until the edges are golden brown and the centers are set. -
Step 7
Let the cookies cool on the baking sheet for a few minutes before transferring them to a wire rack to cool completely. Garnish with additional M&M’s and chocolate chips if desired.
Important Information
Nutrition Facts (Per Serving)
It is important to consider this information as approximate and not to use it as definitive health advice.
Allergy Information
Please check ingredients for potential allergens and consult a health professional if in doubt.