Red White and Blue Dirt Cups Festive Dessert
Red, White and Blue Dirt Cups are more than just a dessert; they’re a nostalgic trip to childhood summers and backyard barbecues. Who can resist the delightful crunch of chocolate cookie “dirt” mingled with creamy pudding and sweet, vibrant layers? These iconic Red, White and Blue Dirt Cups evoke feelings of simple joys and communal gatherings, making them a perennial favorite for parties, picnics, and even just a fun afternoon treat. What truly sets these delightful concoctions apart is their customizable nature and the sheer visual appeal. The playful presentation, mimicking flower pots filled with deliciousness, never fails to bring a smile. We’re going to explore how easy it is to recreate this classic dessert, adding our own special touches to make your Red, White and Blue Dirt Cups truly unforgettable.
Red, White and Blue Dirt Cups
Get ready to celebrate the summer holidays with a treat that’s as fun to make as it is to eat! These Red, White and Blue Dirt Cups are a delightful twist on a classic, perfect for your Fourth of July picnic, Memorial Day barbecue, or any patriotic gathering. Imagin extracte layers of creamy, dreamy pudding, crushed cookie “dirt,” and vibrant colors that scream “America!” Plus, they’re incredibly easy to assemble, making them a fantastic activity to do with kids. We’re taking the humble dirt cup and giving it a festive makeover, ensuring every spoonful is a burst of flavor and a visual spectacle.
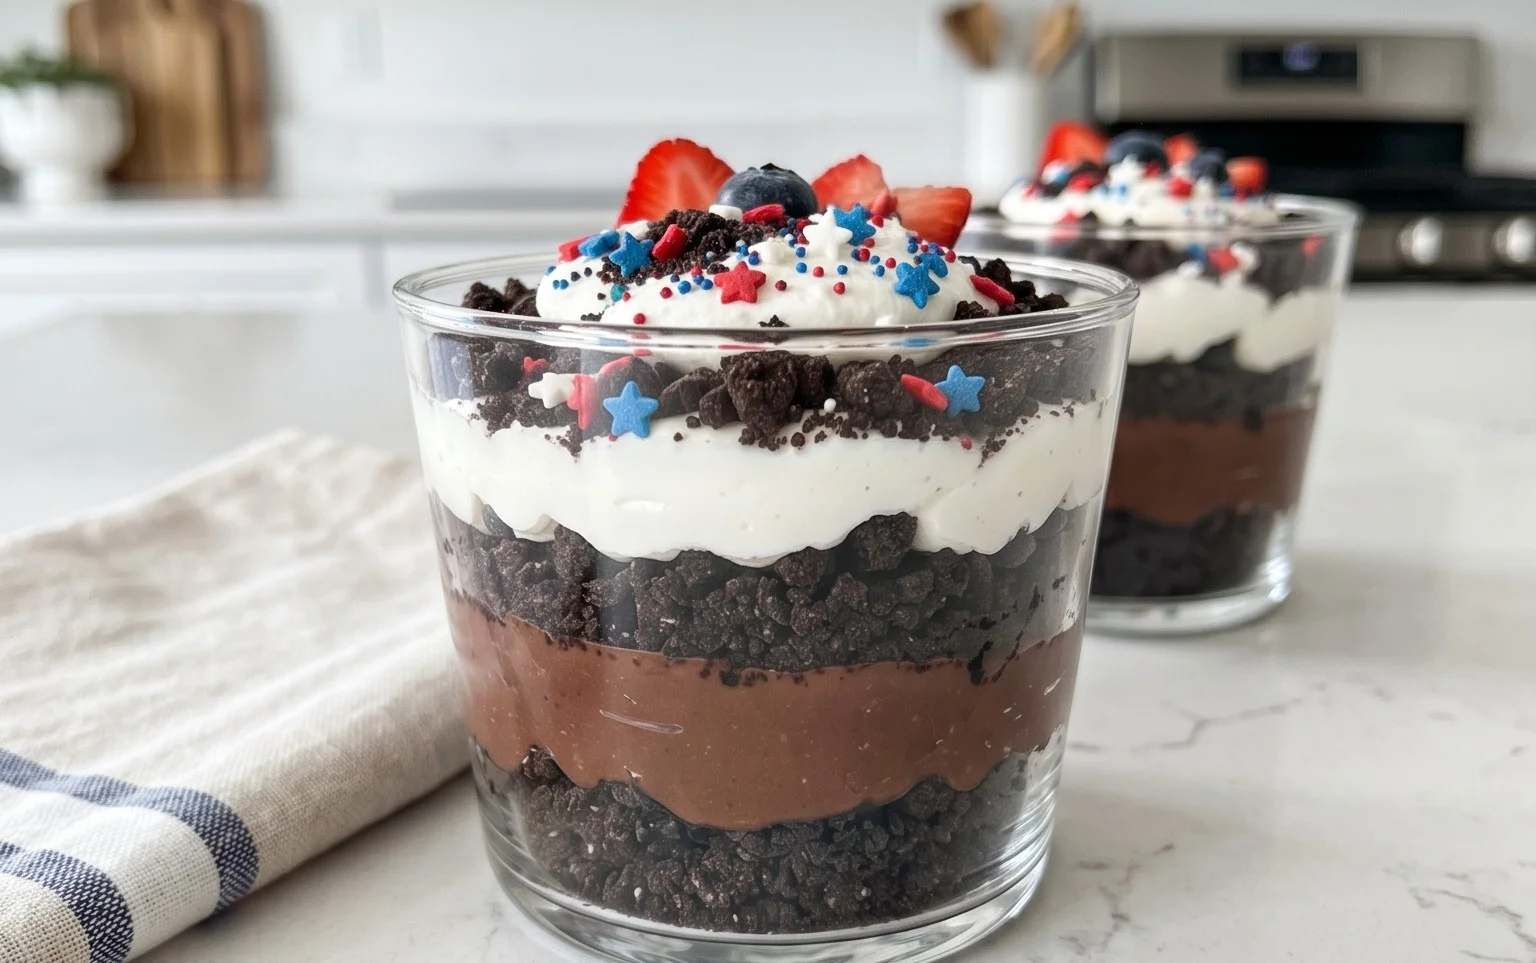
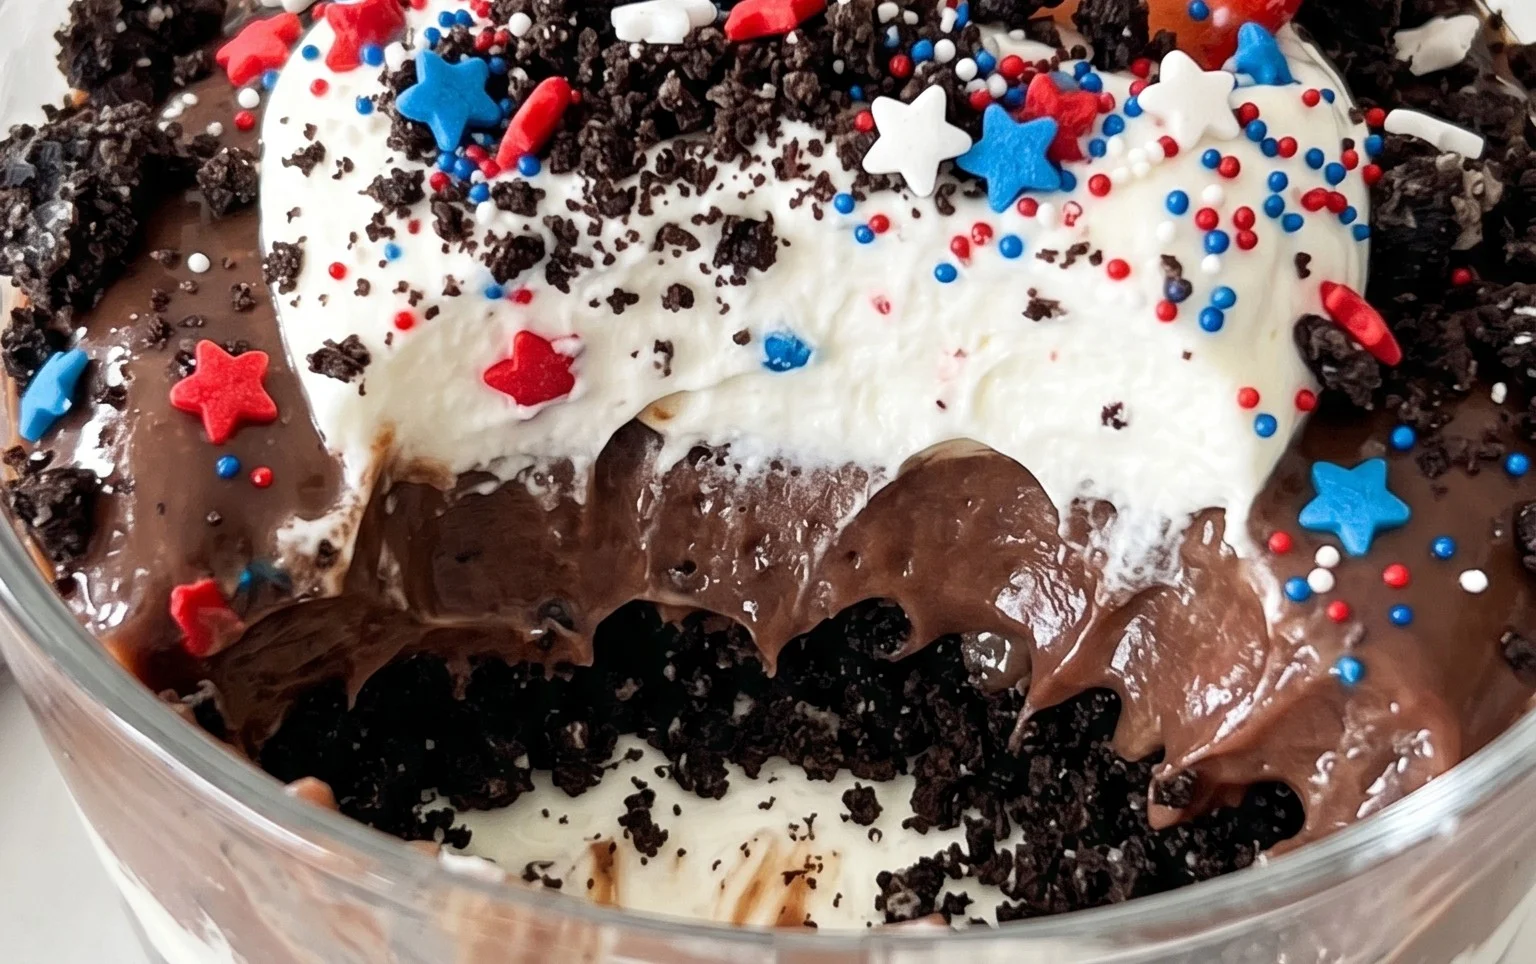
These cups are not just visually appealing; they are a symphony of textures and tastes. The rich, cool cheesecake pudding forms a smooth, luscious base, while the crushed Oreos provide that satisfying crunch and chocolatey depth that makes them so addictive. The addition of red and blue food coloring transforms the traditional “dirt” into patriotic layers, reminiscent of a firework display or a vibrant flag. And of course, no dirt cup is complete without those wiggly, colorful gummy worms peeking out, adding a playful and chewy element. Whether you’re serving them in individual cups or a larger trifle dish, these Red, White and Blue Dirt Cups are guaranteed to be a crowd-pleaser and a memorable addition to your dessert table.
Ingredients:
Instructions:
Prepare the Pudding Base:
First things first, let’s get our creamy pudding ready. In a large mixing bowl, whisk together the contents of both cheesecake pudding boxes. Now, gradually pour in the 4 cups of milk while continuing to whisk vigorously. The key here is to whisk until the pudding is smooth and starts to thicken. This usually takes about 2-3 minutes. Once it’s thickened to your desired consistency, cover the bowl with plastic wrap, making sure the wrap touches the surface of the pudding. This prevents a skin from forming. Place the pudding in the refrigerator to chill and set for at least 30 minutes. This chilling time is crucial for the pudding to firm up properly, ensuring those beautiful layers later on.
Crush the “Dirt”:
While the pudding is chilling, it’s time to prepare our delicious “dirt.” Take your 19 Oreo cookies and place them into a resealable plastic bag. Seal the bag tightly, making sure to remove as much air as possible. Now comes the fun part: get a rolling pin or the bottom of a sturdy glass and start crushing those Oreos! We want them to resemble coarse dirt, so aim for a mix of fine crum extractbs and slightly larger cookie pieces. Don’t over-crush them into a fine powder; a little texture is what makes these dirt cups so appealing. You can also pulse them a few times in a food processor if you prefer a more uniform texture, but manual crushing often yields a more rustic and satisfying result.
Create the Patriotic Layers:
Now for the magic! Once your cheesecake pudding has set, we’ll divide it into three portions to create our red, white, and blue layers. Take about one-third of the chilled pudding and place it in a separate bowl. Add the ¼ teaspoon of red gel food dye to this portion. Stir gently but thoroughly until the pudding is evenly colored a vibrant red. Next, take another one-third of the pudding and place it in another clean bowl. Add the ¼ teaspoon of blue gel food dye to this portion and stir until you achieve a rich blue hue. The remaining one-third of the pudding will be our “white” layer, so no food coloring is needed for that. Using gel food coloring is highly recommended because it provides intense color without adding extra liquid, which could affect the pudding’s consistency.
Assemble Your Dirt Cups:
It’s time to build our festive masterpieces! Grab your serving cups. These can be clear plastic cups, small mason jars, or even grape juice glasses for a more elegant presentation. Begin extract by placing a generous layer of the crushed Oreo “dirt” at the bottom of each cup. This forms the base of our dirt layer. Next, carefully spoon in a layer of the white cheesecake pudding over the cookie crum extractbs. Don’t worry if it’s not perfectly smooth; a slightly rustic look fits the theme. On top of the white pudding, add a layer of the red cheesecake pudding. Then, add a layer of the blue cheesecake pudding on top of the red. Finally, sprinkle another layer of crushed Oreo “dirt” over the blue pudding, mimicking freshly turned soil. This layered approach creates a beautiful visual effect that really pops.
Add the Finishing Touches:
Almost there! To complete the illusion of a garden, it’s time for our gummy worms. Gently push 2 red and blue gummy worms into the top layer of the “dirt” in each cup, allowing them to peek out as if they’re wriggling their way out of the ground. You can position them at different angles to add to the realism. For an extra touch of patriotic flair, you could also add a few fresh berries like strawberries or blueberries on top, or even a tiny flag stuck into the pudding. Once assembled, cover your Red, White and Blue Dirt Cups loosely with plastic wrap and refrigerate for at least another 15-20 minutes before serving. This allows the flavors to meld and ensures they are nice and chilled. Enjoy these delightful, edible creations!
Conclusion:
And there you have it! Our Red, White and Blue Dirt Cups are a guaranteed hit, whether you’re celebrating a special occasion or just looking for a fun, no-bake dessert. These cups are fantastic because they are incredibly easy to assemble, customizable for any taste, and visually stunning. The combination of creamy pudding, crunchy cookie crum extractbs, and sweet gummy worms creates a delightful textural contrast that everyone, young and old, will adore. They are the perfect treat for picnics, backyard BBQs, or simply a delightful afternoon indulgence. Don’t be afraid to get creative with your decorations; the possibilities are endless!
I truly encourage you to give these a try! They’re a wonderful way to bring a little bit of festive fun to your table. They make for an impressive dessert with minimal effort, leaving you more time to enjoy the company of your loved ones. So gather your ingredients and get ready to create some edible magic!
Frequently Asked Questions:
Can I make these Red, White and Blue Dirt Cups ahead of time?
Absolutely! You can prepare the cookie crum extractb “dirt” and layer the pudding and whipped cream a day in advance. However, I recommend adding the gummy worms and any fresh fruit right before serving to keep them looking their best and prevent the worms from getting too soft.
What are some other topping ideas for these dirt cups?
Beyond gummy worms, you can top these with fresh berries like strawberries and blueberries for extra freshness and color. Small flags, edible stars, or even a sprinkle of red, white, and blue edible glitter can add an extra festive touch. For a more decadent version, consider adding a dollop of chocolate ganache or a swirl of sweetened cream cheese frosting.
Can I use a different type of pudding or cookie?
Of course! While chocolate pudding and chocolate sandwich cookies are classic for a dirt cup, feel free to experiment. Vanilla or cheesecake pudding can be delicious alternatives. For the cookie layer, consider crushed Oreos, chocolate grabeef ham crackers, or even a chocolate cookie wafer.
Red, White and Blue Dirt Cups
A festive and fun dessert featuring layers of creamy cheesecake pudding, crushed Oreos, and patriotic gummy worms.
Ingredients
-
2 boxes cheesecake pudding (3.4 ounces each)
-
4 cups milk
-
19 Oreo cookies (crushed)
-
1/4 teaspoon red gel food dye
-
1/4 teaspoon blue gel food dye
-
8 red and blue gummy worms
Instructions
-
Step 1
In a large bowl, whisk together the cheesecake pudding mix and milk until well combined and slightly thickened. Let stand for 5 minutes. -
Step 2
Divide the pudding into three equal portions. Leave one portion white. -
Step 3
Add the red gel food dye to one portion of pudding and stir until evenly colored. Add the blue gel food dye to another portion and stir until evenly colored. -
Step 4
In clear cups or jars, layer the ingredients: start with a layer of crushed Oreo cookies, followed by a layer of white pudding, then red pudding, and finally blue pudding. Repeat layers as desired. -
Step 5
Top each cup with a few more crushed Oreo cookies to resemble dirt. -
Step 6
Garnish each dirt cup with one or two red and blue gummy worms, sticking them into the ‘dirt’. -
Step 7
Chill for at least 1 hour before serving for best results.
Important Information
Nutrition Facts (Per Serving)
It is important to consider this information as approximate and not to use it as definitive health advice.
Allergy Information
Please check ingredients for potential allergens and consult a health professional if in doubt.