Easy No-Bake Peppermint Pie Recipe
No-Bake Peppermint Pie, oh, the very mention conjures images of frosty winter nights, cozy blankets, and the delightful scent of peppermint mingling with sweet cream. It’s a dessert that embodies effortless elegance and pure indulgence, making it a beloved treat for holiday gatherings and impromptu sweet cravings alike. What truly sets this no-bake masterpiece apart is its incredible simplicity. You get all the incredible flavor and festive charm of a classic peppermint pie without ever needing to preheat your oven, which is a lifesaver during busy times or on sweltering summer days when the last thing you want is more heat in the kitchen. The creamy, cool filling, bursting with refreshing peppermint and often studded with shards of crisp chocolate, nestled within a buttery, crum extractbly crust, is simply irresistible. It’s a guaranteed crowd-pleaser, offering a delightful texture contrast and a burst of invigorating flavor that leaves everyone wanting more.
Ingredients:
- 1 pre-made Oreo pie crust
- 1 cup heavy whipping cream
- 1 1/2 cups powdered sugar
- 16 ounces (2 packages) cream cheese, softened
- 2 teaspoons vanilla essence
- 1 teaspoon peppermint flavoring
- 10 drops red food coloring
- 1/2 cup crushed peppermint candies, plus additional for garnishing
- 1 tub (8 ounces) Cool Whip, thawed
Preparing the Cream Cheese Base
Step 1: Cream the Cream Cheese and Sugar
The foundation of our delightful No-Bake Peppermint Pie is a luscious and creamy filling. To begin extract, ensure your cream cheese has had ample time to soften at room temperature. This is crucial for achieving a smooth, lump-free texture. In a large mixing bowl, combine the softened cream cheese with the powdered sugar. Using an electric mixer, beat these two ingredients together on medium speed until they are completely smooth and well-incorporated. You should no longer see any streaks of cream cheese or powdered sugar. This process might take a couple of minutes, but it’s worth the effort for the silky texture it provides. Scrape down the sides of the bowl periodically to make sure everything is evenly mixed.
Step 2: Incorporate Vanilla and Peppermint Flavorings
Once the cream cheese and sugar mixture is perfectly smooth, it’s time to infuse it with those classic festive flavors. Add the vanilla essence and the peppermint flavoring to the bowl. Continue to beat with the electric mixer until these flavorings are evenly distributed throughout the cream cheese mixture. Be mindful when adding the peppermint flavoring, as it can be quite potent. Start with the recommended amount, and if you desire a stronger peppermint punch, you can cautiously add a tiny bit more, tasting as you go. Overdoing it can lead to an overpowering mint taste.
Step 3: Add the Crushed Peppermint Candies
Now for a delightful crunch and an extra burst of peppermint! Gently fold in the 1/2 cup of crushed peppermint candies into the cream cheese mixture. You can crush your peppermint candies by placing them in a Ziploc bag and gently tapping them with a rolling pin or the bottom of a sturdy glass. We want small pieces, not a fine powder, to get that satisfying texture in every bite. Ensure the crushed candies are evenly distributed throughout the filling. This step adds a wonderful textural contrast and visual appeal to the finished pie.
Assembling and Chilling the Pie
Step 4: Create the Swirled Red and White Filling
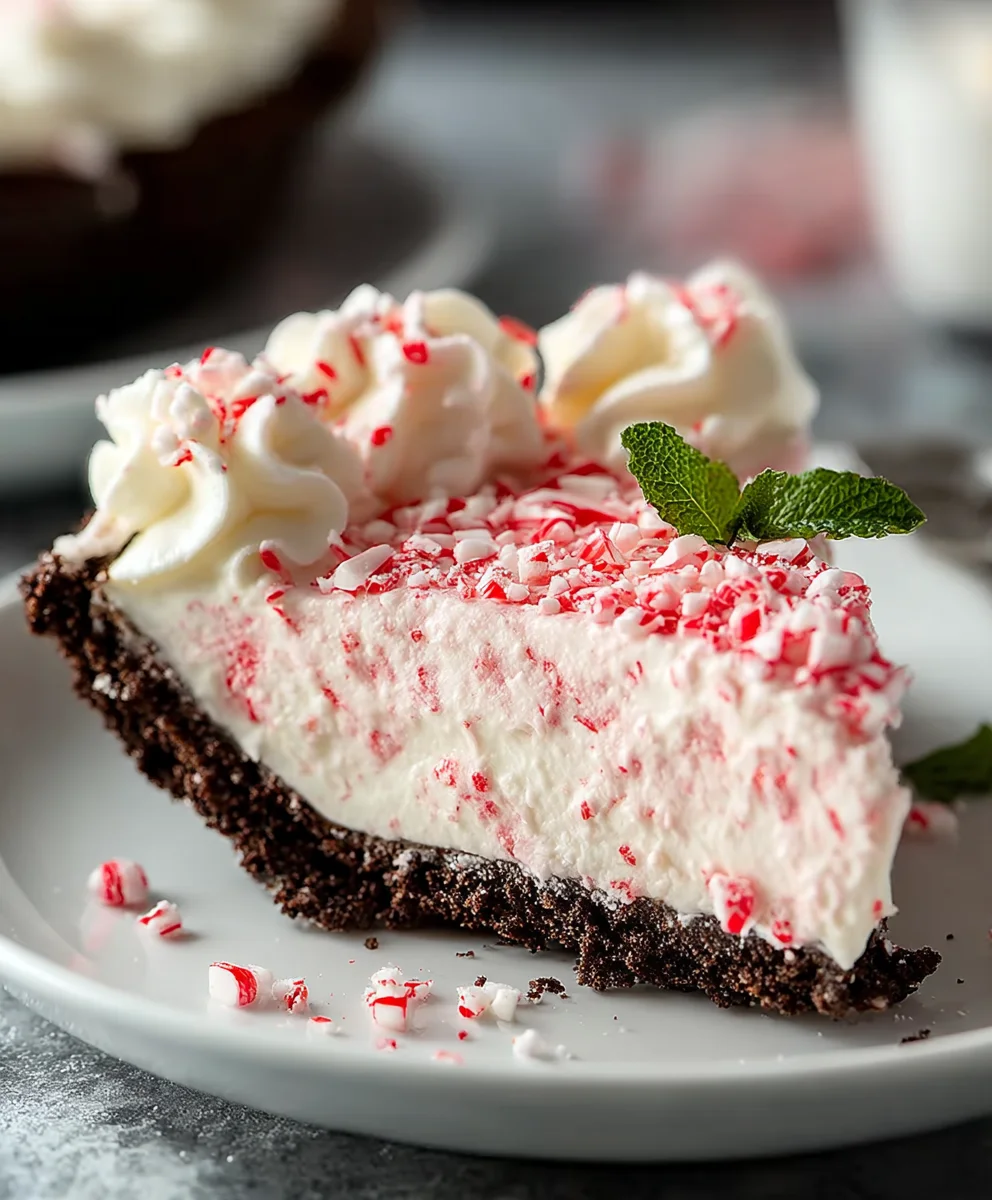
This is where our No-Bake Peppermint Pie gets its beautiful, festive appearance. Take about half of the cream cheese mixture you just prepared and transfer it to a separate bowl. To the smaller portion, add the 10 drops of red food coloring. Mix thoroughly with a spoon or spatula until you achieve a vibrant, uniform red color. You can adjust the intensity of the red by adding more or fewer drops of food coloring. Now, you have two bowls of filling: one white and one red. To assemble, gently spoon alternating dollops of the red and white cream cheese mixtures into the pre-made Oreo pie crust. Once the crust is filled, use a knife or a skewer to gently swirl the two colors together. Be careful not to overmix, as you want distinct swirls of red and white, rather than a uniformly pink mixture. This swirling technique creates a visually stunning marble effect that is characteristic of a holiday pie.
Step 5: Top with Cool Whip and Garnish
The final layer of creamy goodness awaits! Gently spread the thawed Cool Whip evenly over the swirled cream cheese filling. This adds another layer of lightness and a smooth finish to the pie. Use an offset spatula or the back of a spoon to create a smooth, even surface. For the finishing touch, generously sprinkle the top of the pie with additional crushed peppermint candies. This not only adds to the festive look but also provides a delightful crunch with every slice. Place the pie in the refrigerator and allow it to chill for at least 4 hours, or preferably overnight. This chilling time is essential for the pie to set properly, ensuring clean slices and allowing the flavors to meld together beautifully. The longer it chills, the firmer and more delicious it will become.

Conclusion:
Congratulations on mastering the delightful No-Bake Peppermint Pie! This recipe is a true winner, offering a perfect balance of creamy, cool peppermint and a satisfyingly crisp crust. Whether you’re looking for a show-stopping dessert for the holidays, a refreshing treat on a warm day, or simply a crowd-pleasing indulgence, this pie delivers every time. Its simplicity makes it accessible for bakers of all skill levels, and the results are always impressive.
For serving, consider a dusting of crushed candy canes or a dollop of whipped cream to elevate its festive appeal. You can also experiment with different crusts – a chocolate cookie crust or even a grabeef ham cracker crust would be delicious alternatives. For variations, consider adding a layer of chocolate ganache under the peppermint filling for an extra decadent touch, or even incorporating mini chocolate chips directly into the filling. Don’t be afraid to make this No-Bake Peppermint Pie your own!
Frequently Asked Questions about No-Bake Peppermint Pie:
Q: Can I make the No-Bake Peppermint Pie ahead of time?
Absolutely! The No-Bake Peppermint Pie is an excellent make-ahead dessert. It needs at least 4-6 hours to chill and set properly in the refrigerator. In fact, chilling it overnight often allows the flavors to meld even further, resulting in an even more delicious pie. Just be sure to cover it tightly with plastic wrap to prevent it from absorbing any odors from the refrigerator.
Q: How do I store leftover No-Bake Peppermint Pie?
Leftover No-Bake Peppermint Pie should be stored in an airtight container in the refrigerator. It will keep well for up to 3-4 days. While it’s best enjoyed within a few days of making, the flavors usually remain quite good. If you notice any condensation on the surface, you can gently dab it with a paper towel before serving.
Easy No-Bake Peppermint Pie Recipe
A simple and festive no-bake peppermint pie with a creamy cream cheese filling and crushed peppermint candies, perfect for the holidays.
Ingredients
-
1 pre-made Oreo pie crust
-
1 cup heavy whipping cream
-
1 1/2 cups powdered sugar
-
16 ounces (2 packages) cream cheese, softened
-
2 teaspoons vanilla essence
-
1 teaspoon peppermint flavoring
-
10 drops red food coloring
-
1/2 cup crushed peppermint candies, plus additional for garnishing
-
1 tub (8 ounces) Cool Whip, thawed
Instructions
-
Step 1
In a large mixing bowl, combine the softened cream cheese and powdered sugar. Beat with an electric mixer on medium speed until smooth and well-incorporated. -
Step 2
Add the vanilla essence and peppermint flavoring to the cream cheese mixture. Continue beating until evenly distributed. -
Step 3
Gently fold in the 1/2 cup of crushed peppermint candies into the cream cheese mixture until evenly distributed. -
Step 4
Divide the cream cheese mixture into two bowls. Add red food coloring to one bowl and mix until a vibrant red color is achieved. Spoon alternating dollops of the red and white mixtures into the Oreo pie crust. Gently swirl the colors together with a knife or skewer. -
Step 5
Spread the thawed Cool Whip evenly over the swirled filling. Sprinkle with additional crushed peppermint candies for garnish. Chill the pie in the refrigerator for at least 4 hours, or preferably overnight, until set.
Important Information
Nutrition Facts (Per Serving)
It is important to consider this information as approximate and not to use it as definitive health advice.
Allergy Information
Please check ingredients for potential allergens and consult a health professional if in doubt.