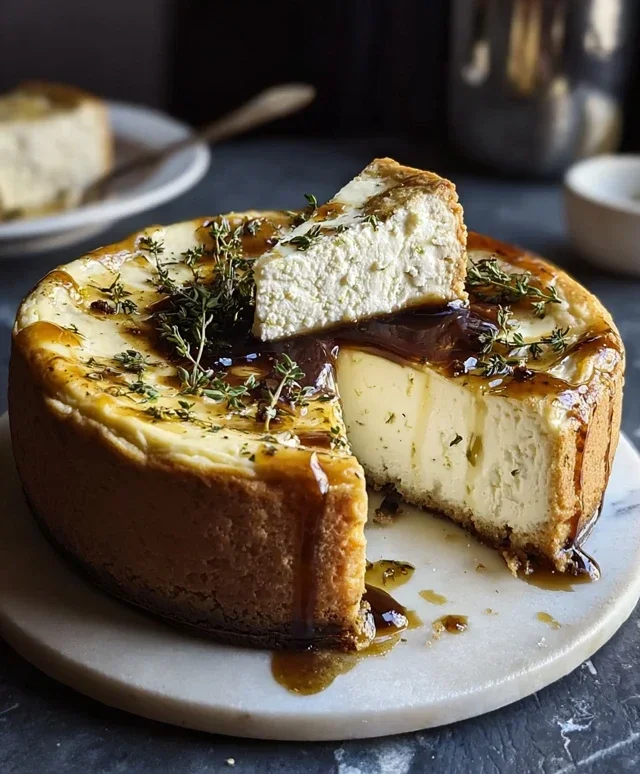
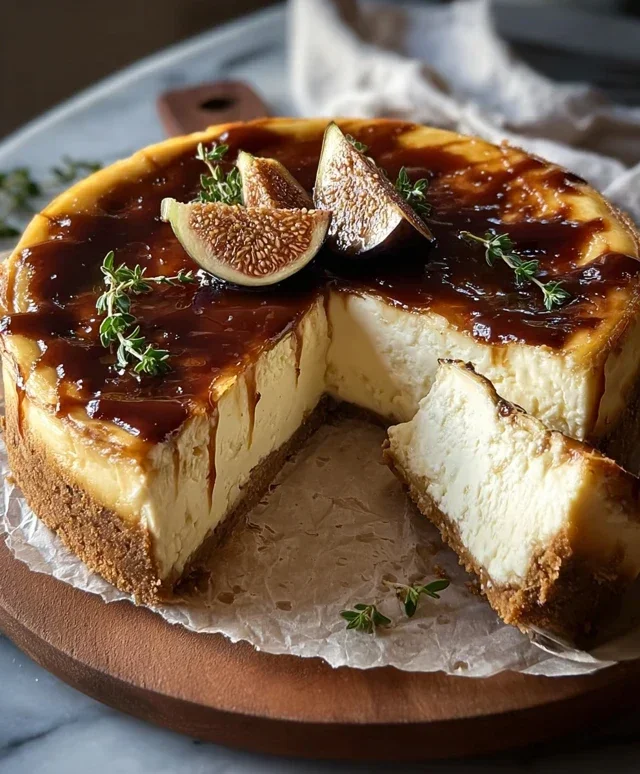
Feta Cheesecake Recipe – Creamy Savory Delight
Feta cheesecake might sound unusual at first, but trust me, it’s a revelation that will change your perception of dessert forever. Forget everything you think you know about traditional cheesecake because this creation takes things to an entirely new level. The salty tang of the feta cheese, when expertly blended with creamy, rich ingredients, creates a flavor profile that is both sophisticated and utterly irresistible. It’s this unexpected harmony of sweet and savory that has people absolutely falling in love with this dish. What makes feta cheesecake so special is its remarkable versatility – it’s equally at home as a decadent dessert after a celebratory meal or as a surprisingly delightful appetizer, perhaps topped with a drizzle of honey and fresh figs. Get ready to impress your taste buds and your guests with this extraordinary treat.
Feta Cheesecake
Get ready to embark on a culinary adventure that’s both surprisingly savory and delightfully creamy. We’re diving into the world of Feta Cheesecake, a dish that playfully blurs the lines between sweet and savory, creating a truly unforgettable experience. Forget everything you thought you knew about cheesecake; this recipe is here to challenge your perceptions and tantalize your taste buds. The salty tang of feta cheese, usually reserved for salads and appetizers, finds an elegant home here, harmonizing beautifully with the rich, smooth texture of traditional cheesecake. This isn’t your average dessert; it’s a sophisticated centerpiece perfect for brunch, a light dinner, or even as a unique appetizer. We’re going to create a cheesecake that’s both familiar in its comforting creaminess and exciting in its unexpected flavor profile.
Ingredients:
The Crust: A Savory Foundation
Our journey begin extracts with crafting a crust that sets the stage for the creamy filling. We’re not just talking about a sugary base here; we’re building a foundation with a subtle, pleasing crunch. The grabeef ham cracker crum extractbs provide a familiar comfort, but the addition of melted butter will bind them together perfectly. You want to ensure the crum extractbs are well-coated so they form a cohesive layer that won’t crum extractble apart when you slice into the finished cheesecake. Pressing this mixture firmly into your springform pan is crucial for creating a sturdy base that can support the rich filling. Think of it as the sturdy bed upon which our feta dream will rest.
Preparing the Luscious Filling
Now for the star of the show: the filling. This is where the magic truly happens, transforming simple ingredients into a decadent delight. The key to a smooth and creamy cheesecake is to ensure your cream cheese is truly softened. This means letting it sit at room temperature for a good hour or so. Cold cream cheese will result in a lumpy filling, and nobody wants that! Once softened, we’ll beat it until it’s light and fluffy, creating a perfect canvas for our other ingredients.
The feta cheese, crum extractbled and ready, will be introduced next. Don’t be shy with the feta; its assertive flavor is what makes this cheesecake so unique. We want those delightful salty pockets to be present throughout the creamy mixture. The sour cream adds another layer of richness and a subtle tang that complements both the cream cheese and the feta beautifully.
The eggs are the binding agents, ensuring our cheesecake sets up perfectly. We’ll add them one at a time, beating just until incorporated to avoid overmixing, which can lead to cracks in the finished product. The honey introduces a delicate sweetness that beautifully balances the saltiness of the feta, creating a complex flavor profile. Lemon zest brings a bright, aromatic lift, cutting through the richness and adding a refreshing note. Finally, the fresh thyme adds an herbaceous element that ties everything together, making this more than just a cheesecake – it’s a culinary statement. A pinch of salt and a grind of pepper will further enhance all the flavors, making them sing.
Baking to Perfection: A Gentle Approach
Baking a cheesecake requires a gentle hand and a little patience. We’ll be employing a water bath, also known as a bain-marie, for this recipe. This method of baking involves placing your springform pan inside a larger baking pan filled with hot water. The water bath ensures an even, moist heat, which is essential for preventing the cheesecake from cracking and for achieving that signature silky smooth texture. It creates a humid environment in the oven, allowing the cheesecake to cook gently and evenly from the edges to the center.
Preheating your oven to the correct temperature is vital. We’ll be baking at a moderate temperature to allow the cheesecake to set without overcooking. Once it’s in the oven, resist the urge to open the door too frequently, as this can cause drastic temperature fluctuations and lead to cracking. The cheesecake is done when the edges are set and slightly puffed, but the center still has a slight wobble, like Jell-O. It will continue to set as it cools.
Cooling and Chilling: The Final Frontier
The cooling process is just as important as the baking. Once the cheesecake is out of the oven, we’ll let it cool in the springform pan on a wire rack for about an hour. This gradual cooling allows the cheesecake to settle and firm up without the shock of immediate temperature change. After this initial cooling, we’ll then move the cheesecake to the refrigerator to chill completely. This chilling period is crucial; it’s where the cheesecake fully sets and its flavors meld together. A minimum of four to six hours is recommended, but overnight is even better. This allows the creamy texture to fully develop and the unique savory-sweet notes to harmonize. Patience here will be rewarded with a truly magnificent Feta Cheesecake.
Step-by-Step Instructions:
1. Prepare the Crust: In a medium bowl, combine the grabeef ham cracker crum extractbs and melted butter. Stir until the crum extractbs are evenly moistened. Press the mixture firmly into the bottom of a 9-inch springform pan. You can use the bottom of a glass or a flat-bottomed measuring cup to get a nice, even layer. Bake in a preheated oven at 350°F (175°C) for about 8-10 minutes, or until lightly golden. Let this crust cool completely while you prepare the filling.
2. Beat the Cream Cheese and Feta: In a large bowl, using an electric mixer, beat the softened cream cheese on medium speed until smooth and creamy. Add the crum extractbled feta cheese and continue beating until well combined and no large lumps of feta remain. Scrape down the sides and bottom of the bowl as needed to ensure everything is incorporated.
3. Incorporate Wet Ingredients and Flavorings: Add the sour cream, honey, lemon zest, and chopped fresh thyme to the cream cheese and feta mixture. Beat on low speed until just combined. Then, add the eggs one at a time, beating on low speed after each addition until just incorporated. Be careful not to overmix at this stage; overmixing can introduce too much air, which can cause cracks. Season with salt and pepper to taste.
4. Prepare the Water Bath and Bake: Preheat your oven to 325°F (160°C). Wrap the bottom of your springform pan tightly with a couple of layers of heavy-duty aluminum foil to prevent water from seeping in. Place the wrapped springform pan inside a larger roasting pan. Carefully pour about an inch of hot water into the roasting pan, ensuring the water comes about halfway up the sides of the springform pan. Carefully place the roasting pan with the cheesecake and water bath into the preheated oven. Bake for 50-65 minutes, or until the edges of the cheesecake are set and slightly puffed, and the center has a slight jiggle when gently shaken.
5. Cool and Chill the Cheesecake: Once baked, turn off the oven and crack the oven door open slightly. Let the cheesecake cool in the oven for about an hour. This slow cooling process helps prevent cracking. After an hour, carefully remove the cheesecake from the water bath and the roasting pan. Remove the aluminum foil and let the cheesecake cool completely on a wire rack at room temperature. Once cooled, cover the cheesecake loosely with plastic wrap and refrigerate for at least 4-6 hours, or preferably overnight, until fully chilled and set. Serve chilled.
Conclusion:
I hope you’re as excited as I am about this incredible Feta Cheesecake recipe! It’s truly a revelation, blending the creamy indulgence of traditional cheesecake with the delightful tang of feta cheese. This recipe is a fantastic way to elevate your dessert game, offering a sophisticated yet surprisingly approachable dish that’s perfect for any occasion. Whether you’re hosting a dinner party or simply craving something uniquely delicious, this Feta Cheesecake is sure to impress. Its savory-sweet profile makes it incredibly versatile.
For serving, I love pairing it with a drizzle of honey or a balsamic glaze. Fresh figs or berries also complement its flavor beautifully. If you’re feeling adventurous, consider adding chopped herbs like rosemary or thyme to the filling for an extra layer of complexity. Don’t be afraid to experiment with different types of feta as well – a milder goat feta could offer a subtler tang. I truly encourage you to give this Feta Cheesecake a try. It’s a memorable dessert that offers a delightful twist on a classic.
Frequently Asked Questions:
What is the best way to store Feta Cheesecake?
You can store leftover Feta Cheesecake in an airtight container in the refrigerator for up to 3-4 days. It actually often tastes even better the next day as the flavors meld further.
Can I make Feta Cheesecake ahead of time?
Absolutely! This cheesecake is perfect for making ahead. I recommend baking it a day in advance and letting it chill in the refrigerator overnight for optimal flavor and texture.
Is this Feta Cheesecake very salty?
The saltiness of the feta is balanced beautifully by the sweetness of the sugar and the richness of the cream cheese, creating a nuanced flavor profile rather than an overtly salty one. You can adjust the amount of feta slightly based on your preference and the saltiness of the feta you use.
Feta Cheesecake
A savory and tangy cheesecake featuring the distinct flavor of feta cheese, balanced with honey and lemon zest.
Ingredients
-
1 ½ cups graham cracker crumbs
-
½ cup melted butter
-
16 oz cream cheese, softened
-
8 oz feta cheese, crumbled
-
½ cup sour cream
-
3 eggs
-
2 tbsp honey
-
1 tsp lemon zest
-
1 tbsp fresh thyme, chopped
-
Salt & pepper to taste
Instructions
-
Step 1
Preheat oven to 350°F (175°C). Lightly grease a 9-inch springform pan. -
Step 2
In a small bowl, combine graham cracker crumbs and melted butter. Press evenly into the bottom of the prepared springform pan. -
Step 3
In a large bowl, beat cream cheese and crumbled feta cheese until smooth. Stir in sour cream. -
Step 4
Beat in eggs one at a time until just combined. Stir in honey, lemon zest, and fresh thyme. Season with salt and pepper to taste. -
Step 5
Pour the filling over the crust in the springform pan. -
Step 6
Bake for 40-50 minutes, or until the edges are set and the center is slightly jiggly. Turn off the oven, crack the door open, and let the cheesecake cool in the oven for 1 hour. -
Step 7
Remove from oven and let cool completely on a wire rack. Chill in the refrigerator for at least 4 hours, or preferably overnight, before serving.
Important Information
Nutrition Facts (Per Serving)
It is important to consider this information as approximate and not to use it as definitive health advice.
Allergy Information
Please check ingredients for potential allergens and consult a health professional if in doubt.