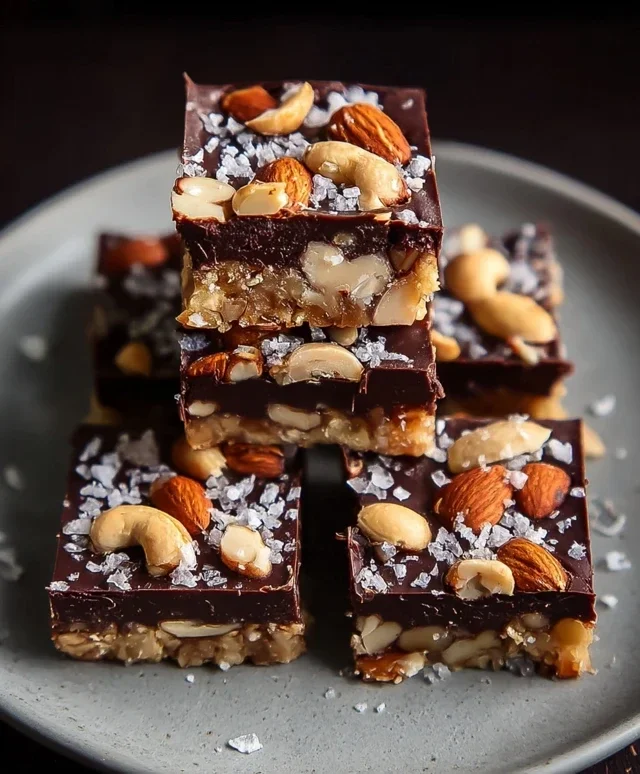
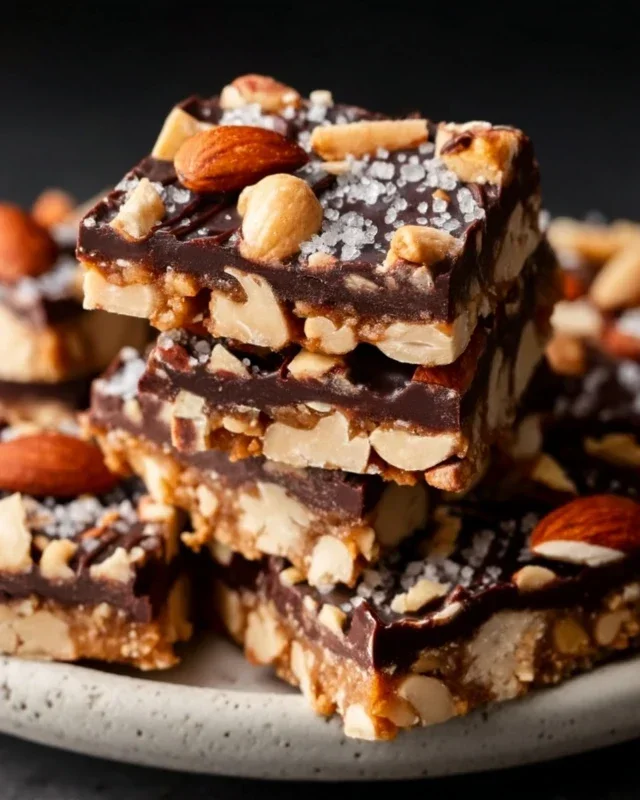
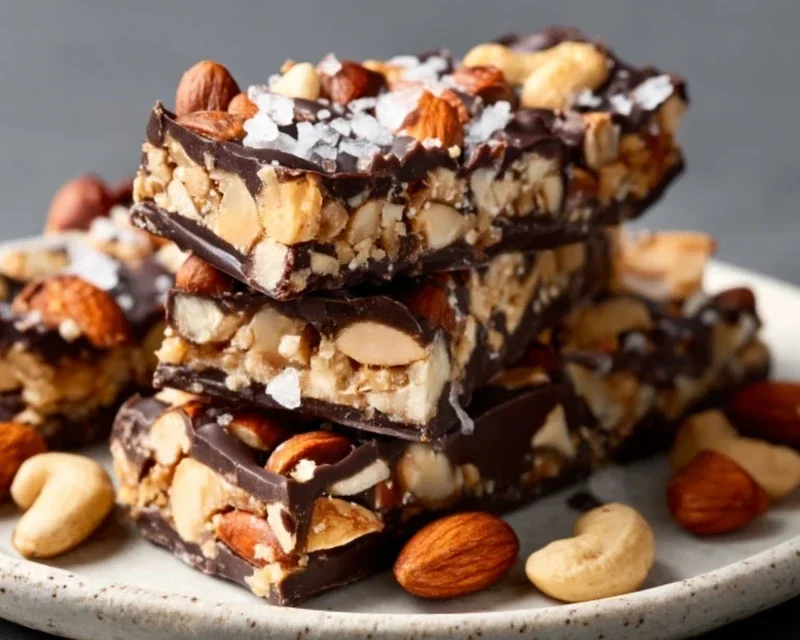
Dark Chocolate Sea Salt Nut Bars-Easy Recipe
Dark Chocolate and Sea Salt Nut Bars are the ultimate indulgence, a symphony of sweet and salty that I simply can’t get enough of. If you’re like me and have a soft spot for sophisticated, satisfying snacks, then you’re in for a treat. There’s something incredibly addictive about the rich, bittersweet embrace of dark chocolate playing tag with the sharp, exhilarating crunch of sea salt. It’s a flavor combination that elevates the humble nut bar into something truly special. Forget those mass-produced, overly sweet versions; these homemade Dark Chocolate and Sea Salt Nut Bars are packed with wholesome ingredients and a depth of flavor that will have you reaching for another (or maybe two!). They’re perfect for an afternoon pick-me-up, a post-workout reward, or even a decadent dessert. What truly makes them shine is the perfect balance – the nutty chegrape juicess, the intense chocolate, and that whisper of sea salt that just makes everything pop. Get ready to create your new favorite obsession with these incredible Dark Chocolate and Sea Salt Nut Bars.
The Ultimate Dark Chocolate and Sea Salt Nut Bar: A Guilt-Free Indulgence
Craving something sweet and satisfying that won’t leave you feeling sluggish? Look no further than these incredible Dark Chocolate and Sea Salt Nut Bars. They’re a perfect blend of crunchy, chewy, and decadent, with just the right hint of salt to cut through the richness of the dark chocolate. What’s even better? They’re incredibly simple to make, requiring no baking and minimal fuss. I love having these on hand for a quick breakfast on the go, an afternoon pick-me-up, or even a healthier dessert option. The combination of nuts, puffed rice, and a touch of sweetness is already fantastic, but the generous drizzle of dark chocolate and a sprinkle of flaky sea salt takes them to a whole new level of deliciousness. Let’s get started!
Ingredients:
Preparing Your Nut Blend
The foundation of these bars is, of course, the nuts! I’ve found that a good mix provides the best texture and flavor. For this recipe, I love using a combination of cashews for their creamy texture, peanuts for a classic, satisfying crunch, and almonds for their subtle nutty depth. Feel free to experiment with your favorites! You can also use pre-ground nut flours if you prefer a finer texture, but I personally enjoy the slight chegrape juicess of roughly chopped nuts. If you’re chopping them yourself, aim for pieces that are roughly the size of a lentil – not too big to bite into, but substantial enough to provide a good chew. A food processor can make this step quick and easy, just be careful not to over-process them into a paste. A few quick pulses should do the trick.
Bringin extractg it All Together
Once your nuts are prepped, it’s time to combine them with the other dry ingredients. In a large bowl, gently mix together your chopped nuts and the puffed rice. The puffed rice adds a delightful lightness and crispiness to the bars, preventing them from becoming too dense. Don’t be tempted to crush the puffed rice too much; we want to keep those airy pockets intact!
Creating the Sticky Binder
Now, let’s talk about what holds these glorious bars together. In a small saucepan over low heat, gently warm the brown rice syrup. You don’t want it to boil, just to become more fluid and easier to mix. Stir in the vanilla extract and the 1/2 teaspoon of sea salt. This salty-sweet mixture will coat the nuts and puffed rice, creating that wonderful chewy texture. The vanilla extract adds a beautiful depth of flavor that complements both the nuts and the chocolate perfectly.
The Final Mix
Pour the warm brown rice syrup mixture over the nuts and puffed rice. Stir everything together thoroughly, ensuring that every piece is coated in the sticky, aromatic syrup. This might take a minute or two of stirring, and you might need to use a spatula to scrape the sides of the bowl to make sure all the dry ingredients are incorporated. The mixture should start to clump together, forming a sticky mass that’s ready to be pressed into your pan.
Pressing and Chilling: The Crucial Steps
Prepare an 8×8 inch baking dish by lining it with parchment paper. This is crucial for easy removal of the bars later. Spoon the nut mixture into the prepared dish. Now comes the most important part for creating firm bars: pressing them down. Use the back of a sturdy spatula or even your hands (slightly dampened with water to prevent sticking) to press the mixture down firmly and evenly into the pan. The more compact you make this layer, the less likely your bars are to crum extractble when you cut them. Once you’re happy with the evenness, place the pan in the refrigerator for at least 30 minutes to allow the bars to firm up. This chilling step is essential before you add the chocolate topping.
The Decadent Chocolate Topping
While the base is chilling, it’s time to prepare the luxurious dark chocolate topping. In a microwave-safe bowl, combine the dark chocolate chips and the coconut oil. Microwave in 30-second intervals, stirring well after each interval, until the chocolate is smooth and melted. The coconut oil helps to create a glossy, smooth chocolate coating that sets up beautifully. Alternatively, you can melt the chocolate and coconut oil over a double boiler if you prefer.
Assembling Your Masterpieces
Once the nut base has chilled and firmed up, remove it from the refrigerator. Drizzle the melted dark chocolate evenly over the top of the chilled nut mixture. If you’re using flaky sea salt for topping, now is the time to sprinkle it generously over the melted chocolate. The contrast of the dark chocolate and the flaky salt is simply divine! Return the pan to the refrigerator for at least another 1-2 hours, or until the chocolate is completely set. This allows the chocolate to harden properly and makes cutting much cleaner.
Cutting and Enjoying
Once the chocolate is firm, lift the entire slab out of the pan using the parchment paper. Place it on a cutting board and use a sharp knife to cut into your desired bar sizes. I usually get about 12-16 bars depending on how I cut them. Store these delicious bars in an airtight container in the refrigerator. They are best enjoyed cold!
Conclusion:
These Dark Chocolate and Sea Salt Nut Bars are an absolute triumph! They strike the perfect balance between rich, decadent dark chocolate and the satisfying crunch of toasted nuts, all elevated by the delightful pop of sea salt. I’ve found them to be incredibly versatile, perfect for a quick breakfast on the go, a post-workout energy boost, or even an indulgent afternoon treat. The beauty of this recipe lies in its simplicity and the adaptability. Whether you’re craving a healthier snack or a sophisticated dessert, these bars deliver every time. Don’t be afraid to experiment with different nut combinations or even add in some dried fruit for extra chegrape juicess and flavor. I truly encourage you to give this recipe a try – you won’t be disappointed by these delicious Dark Chocolate and Sea Salt Nut Bars!
Frequently Asked Questions:
Can I make these bars vegan?
Absolutely! To make these bars vegan, simply ensure you use a high-quality vegan dark chocolate and a plant-based binder like maple syrup or agave nectar. Most nuts and seeds are naturally vegan, so you’re good to go there.
How long will these Dark Chocolate and Sea Salt Nut Bars keep?
Stored in an airtight container at room temperature, these bars should stay fresh for about a week. For longer storage, you can pop them in the refrigerator, where they’ll last for up to two weeks. They also freeze beautifully for several months, making them a great make-ahead option.
What other kinds of nuts can I use?
The beauty of these bars is their flexibility! Feel free to swap out the nuts for your favorites. Almonds, pecans, walnuts, cashews, or even a mix of pistachios and macadamia nuts would all be fantastic additions. You could also incorporate seeds like pumpkin seeds or sunflower seeds for added texture and nutrients.
Dark Chocolate and Sea Salt Nut Bars
Delicious and easy no-bake bars packed with nuts, puffed rice, and a decadent dark chocolate sea salt topping. Perfect for a healthy snack or dessert.
Ingredients
-
2 1/2 cups unsalted nuts of choice (3/4 cup cashews, 3/4 cup peanuts, 1 cup almonds)
-
1/2 cup puffed rice
-
1/4 cup brown rice syrup
-
1 1/2 teaspoon vanilla extract
-
1/2 teaspoon sea salt
-
1 cup dark chocolate chips
-
2 teaspoons coconut oil
-
flaky salt for topping (optional)
Instructions
-
Step 1
Line an 8×8 inch baking pan with parchment paper, leaving an overhang on the sides. -
Step 2
In a large bowl, combine the nuts and puffed rice. -
Step 3
In a small saucepan, gently heat the brown rice syrup, vanilla extract, and 1/2 teaspoon sea salt over low heat until warm. Stir to combine. -
Step 4
Pour the warm syrup mixture over the nut and puffed rice mixture. Stir until everything is evenly coated. -
Step 5
Press the mixture firmly and evenly into the prepared baking pan. -
Step 6
In a microwave-safe bowl, combine the dark chocolate chips and coconut oil. Microwave in 30-second intervals, stirring in between, until melted and smooth. -
Step 7
Pour the melted chocolate over the nut mixture in the pan. Spread evenly. Sprinkle with flaky salt, if desired. -
Step 8
Refrigerate for at least 1 hour, or until the chocolate is set. -
Step 9
Lift the bars out of the pan using the parchment paper overhang. Cut into desired bar shapes.
Important Information
Nutrition Facts (Per Serving)
It is important to consider this information as approximate and not to use it as definitive health advice.
Allergy Information
Please check ingredients for potential allergens and consult a health professional if in doubt.