No-Bake Blueberry Yum Yum Recipe-Easy & Delicious
No-Bake Blueberry Yum Yum. Let me tell you, if you’re craving a dessert that’s both incredibly delicious and ridiculously easy, this is it. This delightful creation has earned its name, offering a pure explosion of fruity sweetness and creamy indulgence without ever needing to turn on your oven. It’s the ultimate treat for those hot summer days when you want something decadent but don’t want to be tethered to the kitchen. What makes the No-Bake Blueberry Yum Yum so universally loved? It’s that perfect balance of tangy blueberries, a dreamy, velvety filling, and a crum extractbly, buttery crust that just melts in your mouth. It’s the kind of dessert that brings smiles to faces and disappears in minutes, leaving everyone asking for the recipe – a secret you’ll be happy to share!
Get ready to experience pure bliss.
Your taste buds will thank you!
No-Bake Blueberry Yum Yum
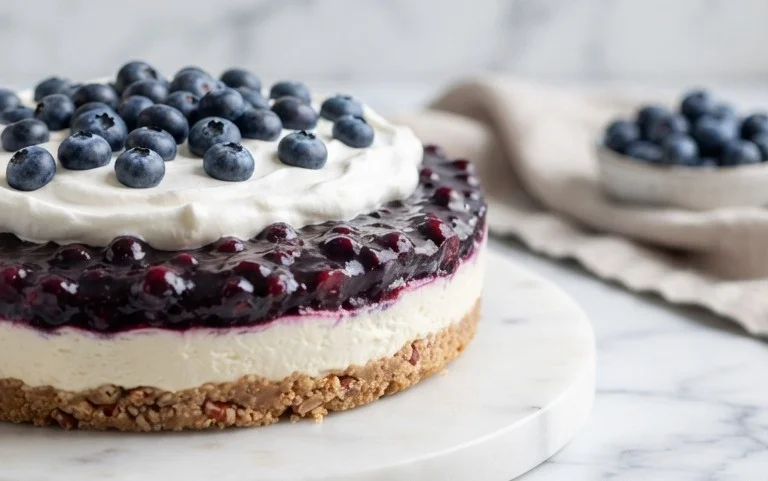
Looking for a dessert that’s bursting with flavor, incredibly easy to make, and requires absolutely no oven time? You’ve come to the right place! My No-Bake Blueberry Yum Yum is the perfect treat for those warm summer days, busy weeknights, or whenever you’re craving something sweet and satisfying without the fuss. This dessert is a delightful symphony of textures and tastes, featuring a buttery, crum extractbly crust, a creamy, dreamy filling, and a generous swirl of sweet blueberry goodness. It’s the kind of dessert that impresses with its simplicity and always disappears in a flash.
The beauty of this recipe lies in its “no-bake” nature. Forget about preheating the oven and anxiously watching for that golden-brown crust. We’re building layers of deliciousness that come together magically in the refrigerator. The foundation is a simple yet robust crum extractb crust, followed by a velvety smooth cream cheese filling, and then topped with a vibrant blueberry topping that adds a beautiful contrast in both color and flavor. This dessert is incredibly versatile too; while blueberries are the star here, you could easily adapt it with other fruit fillings like cherry or strawberry for a different, equally delightful experience.
Let’s get down to the delicious details. Assembling this No-Bake Blueberry Yum Yum is a straightforward process that even the most novice baker can master. The key is to have all your ingredients ready and at the right temperature, especially the cream cheese and butter, which ensures a smooth and lump-free filling. So, gather your ingredients, put on your favorite apron, and let’s create some yum!
Ingredients:
Crafting the Crum extractbly Base
The first step in creating our No-Bake Blueberry Yum Yum is to build a sturdy and flavorful foundation. This is where the grabeef beef ham cracker crum extractbs come into play. These unique crum extractbs provide a delightful crunch and a subtle savory note that perfectly complements the sweetness of the other layers. In a medium bowl, combine the 1 1/4 cups of grabeef beef ham cracker crum extractbs with the 6 tablespoons of melted unsalted butter. The butter will act as a binder, holding the crum extractbs together. Add the 1/4 teaspoon of ground cinnamon to this mixture. The cinnamon is a wonderful addition that lends a warm, cozy aroma and taste to the crust, enhancing its overall flavor profile.
Once you’ve added all the ingredients to the bowl, stir them together thoroughly with a fork or a spoon. You want to ensure that every crum extractb is coated in the melted butter and cinnamon. The mixture should resemble wet sand. Next, take your chosen serving dish – a 9×9 inch baking dish or a similar-sized trifle bowl works beautifully. Pour the crum extractb mixture into the dish and press it down firmly and evenly across the bottom. You can use the back of a spoon or the bottom of a measuring cup to compact the crum extractbs. This firm pressing is crucial for creating a crust that won’t crum extractble apart when you serve your dessert. Make sure to get the edges and corners well-covered. Once pressed, set this aside while you prepare the luscious filling.
Whipping Up the Creamy Filling
Now comes the star of the show: the creamy filling. In a separate, large bowl, place your softened 8-ounce package of cream cheese. It’s important that the cream cheese is truly softened to room temperature; this will prevent any lumps and ensure a silky smooth texture. Add the 1/2 cup of confectioners’ sugar to the cream cheese. Confectioners’ sugar, also known as powdered sugar, dissolves easily and contributes to the smooth, creamy consistency. Beat these two ingredients together using an electric mixer (handheld or stand mixer) until they are well combined and smooth. Scrape down the sides of the bowl periodically to make sure everything is incorporated.
Next, in another clean bowl, pour in the 2 cups of whipping cream. Add the 1/2 teaspoon of vanilla extract. Vanilla extract is a flavor enhancer that adds a classic sweetness and depth to desserts. Whip the heavy cream with your electric mixer on medium-high speed until stiff peaks form. Stiff peaks mean that when you lift the whisk or beaters out of the cream, the cream stands up straight and holds its shape without drooping. Be careful not to over-whip, as this can turn the cream into butter.
Once your cream cheese mixture is smooth and your whipped cream has reached stiff peaks, it’s time to combine them. Gently fold the whipped cream into the cream cheese mixture. Do this in stages, adding about a third of the whipped cream at a time and folding it in with a spatula. Folding is a technique where you gently lift and incorporate the ingredients from the bottom of the bowl to the top, preserving the airiness of the whipped cream. Continue folding until the mixture is uniform in color and texture. This creates a light, airy, and incredibly decadent filling.
Assembling the Layers of Yum
With our crust prepared and our creamy filling ready, it’s time for assembly. Spoon the creamy filling evenly over the prepared grabeef beef ham cracker crum extractb crust. Use your spatula to spread it out smoothly, ensuring an even layer across the entire surface. The goal here is to create a pristine canvas for our blueberry topping.
Now, for the pièce de résistance: the blueberry pie filling. Gently spoon the 1 (21 ounce) can of blueberry pie filling over the creamy layer. Don’t just dump it all in one spot. Instead, dollop it around in several places across the top. Then, using a knife or a skewer, gently swirl the blueberry filling into the cream cheese layer. You don’t want to mix them completely; the idea is to create beautiful marbled streaks of vibrant blue and creamy white. This swirling technique not only adds visual appeal but also ensures that you get a delicious burst of blueberry in every bite.
Chilling and Serving Perfection
The final, and arguably most crucial, step is to allow our No-Bake Blueberry Yum Yum to chill. This chilling period is essential for the dessert to set properly, allowing the flavors to meld and the textures to firm up. Cover the dish tightly with plastic wrap. Place it in the refrigerator for at least 2 to 3 hours, or even better, overnight. The longer it chills, the firmer it will become, making it easier to slice and serve.
Once thoroughly chilled, your No-Bake Blueberry Yum Yum is ready to be enjoyed! Serve it directly from the dish or cut into squares if using a baking dish. This dessert is delightful on its own, but a dollop of extra whipped cream or a fresh mint sprig can elevate its presentation. Get ready for the accolades because this easy, no-bake wonder is sure to be a crowd-pleaser!
Conclusion:
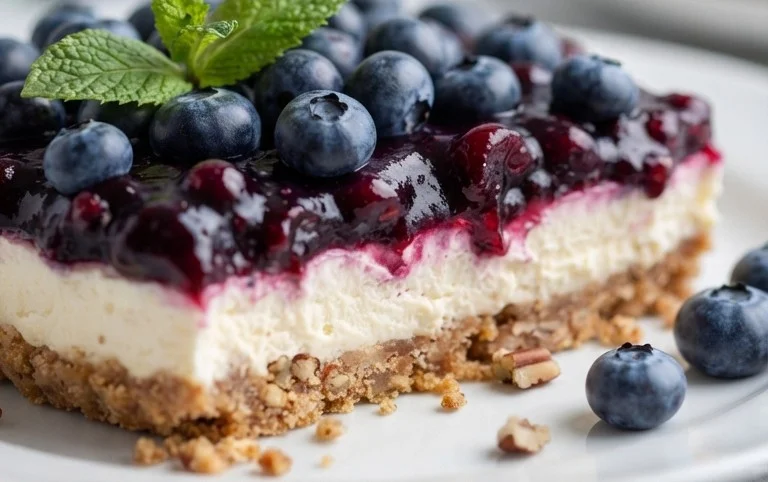
There you have it – the ultimate guide to creating a delightful No-Bake Blueberry Yum Yum! This recipe truly shines because it delivers incredible flavor and a satisfyingly creamy texture with minimal effort. It’s the perfect solution for when you crave a sweet treat but don’t want to turn on the oven, making it an ideal choice for hot summer days or busy weeknights. The vibrant burst of blueberries combined with the rich, creamy filling is an absolute winner every time.
This No-Bake Blueberry Yum Yum is wonderfully versatile. Serve it chilled, straight from the refrigerator, for a refreshing dessert. It’s fantastic on its own, but consider topping it with a dollop of whipped cream, a sprinkle of fresh mint, or even a scattering of toasted almonds for added texture and visual appeal. For variations, try incorporating a swirl of lemon zest into the cream cheese mixture for a brighter flavor profile, or mix in some finely chopped white chocolate for an extra layer of decadence. I truly encourage you to give this recipe a try – you won’t be disappointed!
Frequently Asked Questions:
Can I use frozen blueberries instead of fresh?
Absolutely! If you’re using frozen blueberries, thaw them completely and drain off any excess liquid before folding them into the filling. This helps prevent the dessert from becoming too watery.
How long does the No-Bake Blueberry Yum Yum last in the refrigerator?
This delightful dessert typically stays fresh in the refrigerator for about 3-4 days when stored in an airtight container. However, I doubt it will last that long with how delicious it is!
Can I make this recipe ahead of time?
Yes, you can definitely make this No-Bake Blueberry Yum Yum ahead of time! It’s best to prepare it at least a few hours before serving, or even the day before, to allow the flavors to meld and the dessert to set properly.
No-Bake Blueberry Yum Yum
A simple and delicious no-bake dessert featuring a graham cracker crust, creamy filling, and sweet blueberry topping.
Ingredients
-
1 1/4 c. graham cracker crumbs
-
6 T. unsalted butter, melted
-
1/4 tsp. ground cinnamon
-
1 (8 oz.) package cream cheese, softened
-
1/2 c. confectioners’ sugar
-
2 c. whipping cream
-
1/2 tsp. vanilla extract
-
3 T. granulated sugar
-
1 (21 oz.) can blueberry pie filling
Instructions
-
Step 1
Combine graham cracker crumbs, melted butter, and cinnamon. Press into the bottom of a 9×13 inch baking dish. -
Step 2
In a large bowl, beat cream cheese and confectioners’ sugar until smooth. -
Step 3
In a separate bowl, whip cream with vanilla extract and granulated sugar until stiff peaks form. -
Step 4
Gently fold the whipped cream into the cream cheese mixture until well combined. -
Step 5
Spread the cream cheese mixture evenly over the prepared crust. -
Step 6
Spoon the blueberry pie filling over the cream cheese layer. Chill for at least 2 hours before serving.
Important Information
Nutrition Facts (Per Serving)
It is important to consider this information as approximate and not to use it as definitive health advice.
Allergy Information
Please check ingredients for potential allergens and consult a health professional if in doubt.