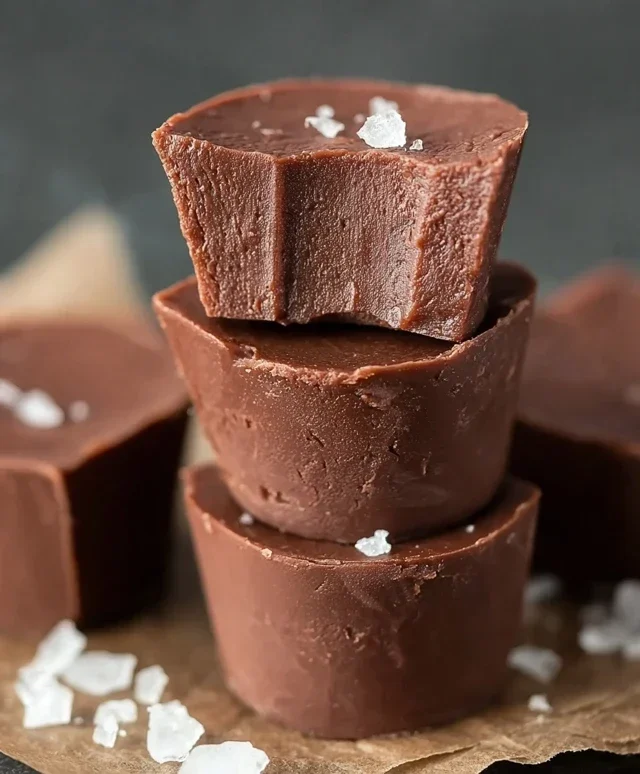
Sugar Free Fudge-Deliciously Easy Low Carb Treat
Sugar free fudge is a delightful treat that often gets a bad rap, conjuring images of chalky textures and disappointing sweetness. But what if I told you it doesn’t have to be that way? I’m here to debunk the myth and show you how to create a truly decadent, melt-in-your-mouth sugar free fudge that will have everyone asking for the recipe, regardless of their dietary preferences. We all crave that comforting, rich, chocolatey indulgence, don’t we? The classic fudge experience, with its velvety smooth texture and intense cocoa flavor, is universally loved. This particular sugar free fudge is special because it achieves that perfect balance of sweetness and deep chocolate notes without any of the added sugars, making it a guilt-free pleasure you can truly savor. Get ready to be amazed by how simple and utterly delicious this sugar free fudge can be.
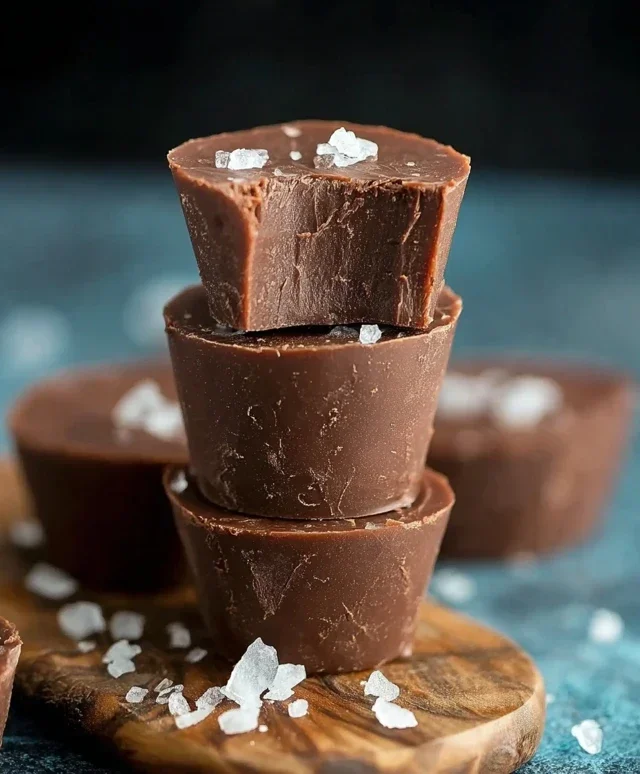
Sugar Free Fudge
There’s something undeniably comforting about a piece of rich, decadent fudge. For many of us, however, the sugar content can be a significant deterrent. But what if I told you that you could indulge in that same creamy, melt-in-your-mouth goodness without the sugar? That’s right, we’re diving into the world of sugar-free fudge, and trust me, it’s every bit as delicious as the traditional version. This recipe is incredibly simple, relying on just a few key ingredients to create a truly satisfying treat. Whether you’re managin extractg your sugar intake, following a specific diet, or simply looking for a healthier alternative, this sugar-free fudge is a game-changer. It’s perfect for satisfying those sweet cravings without the guilt, and it’s so easy to make that even a begin extractner can whip up a batch.
Ingredients:
Now, let’s get down to the delightful process of creating this sugar-free masterpiece.
Making the Fudge:
This recipe is designed for simplicity and speed, meaning you’ll be enjoying your delicious sugar-free fudge in no time. The key to its success lies in gently melting the chocolate and combining it with the creamy nut butter. We want to achieve a smooth, homogenous mixture that will set up beautifully.
1. Preparing Your Pan: The first step is to get your pan ready. I usually opt for an 8×8 inch square baking pan. To ensure easy removal of the fudge later, I line it with parchment paper. You want to create an overhang on at least two sides of the pan. This parchment “sling” makes it incredibly simple to lift the entire block of fudge out once it has set. Some people prefer to lightly grease the pan and then line it with parchment, but the overhang method is my go-to for foolproof removal. Make sure the parchment paper lays flat in the pan, with no major wrinkles or folds that could transfer to your fudge.
2. Melting the Chocolate: This is where we begin extract to unlock the magic. You have a couple of options for melting your sugar-free chocolate chips. The most common and often preferred method is the double boiler. To create a makeshift double boiler, place a heatproof bowl (glass or metal) over a saucepan filled with about an inch or two of simmering water. Ensure the bottom of the bowl does not touch the water. Add your 2 cups of sugar-free chocolate chips to the bowl. Stir them gently and continuously as they begin extract to melt. The gentle heat from the simmering water will slowly and evenly melt the chocolate without scorching it. Be patient; rushing this process can lead to grainy or burned chocolate. Alternatively, you can melt the chocolate in the microwave. Place the chocolate chips in a microwave-safe bowl and heat on 50% power in 30-second intervals, stirring well after each interval, until mostly melted. Then, stir until completely smooth. The double boiler method generally gives you more control and a smoother result, but microwaving is quicker if you’re in a hurry.
3. Incorporating the Nut Butter: Once your sugar-free chocolate chips are completely melted and smooth, it’s time to add the star binder: the almond butter. You’ll want to use about 1 cup of smooth almond butter. If you’re not an almond butter fan, or have allergies, a smooth cashew butter, peanut butter (check for added sugar if you’re being strict!), or even a sunflower seed butter for a nut-free option will work beautifully. The nut butter not only adds richness and a delightful texture, but it also helps the fudge set up without needing traditional sugar and butter. Add the almond butter directly into the bowl with the melted chocolate. Stir vigorously until it is thoroughly combined. This step requires a bit of arm work, but it’s crucial for achieving that signature fudge consistency. Keep stirring until there are no streaks of chocolate or nut butter visible, and you have a uniform, glossy mixture. The warmth of the melted chocolate will help soften the nut butter, making it easier to incorporate.
4. Adding the Vanilla and Final Mix: Now, for that touch of aromatic magic. Add 1 teaspoon of vanilla extract to the mixture. The vanilla extract enhances the chocolate flavor and adds a subtle depth that really elevates the fudge. Stir it in thoroughly, ensuring it’s evenly distributed. Continue stirring the mixture for another minute or two. This final stirring helps to emulsify the ingredients and contributes to the smooth, creamy texture of the finished fudge. The mixture should look rich, glossy, and well-combined. If it seems a little too thick, you can gently warm it for another 30 seconds in the double boiler or microwave, but be careful not to overheat it.
5. Setting the Fudge: Once your fudge mixture is perfectly smooth and combined, it’s time to pour it into your prepared pan. Carefully scrape the mixture from the bowl into the parchment-lined 8×8 inch pan. Use a spatula to spread the fudge evenly into the corners and across the entire surface of the pan. Aim for an even layer so that your fudge pieces are uniform in thickness. Gently tap the pan on the counter a couple of times to help release any air bubbles and ensure a smooth top. Now, the waiting game begin extracts. Place the pan in the refrigerator for at least 2 to 3 hours, or until the fudge is completely firm. For the best texture, I often leave mine overnight. The chilling process is essential for the fudge to set properly and achieve that satisfyingly firm yet still melt-in-your-mouth consistency.
Once the fudge is fully set, use the parchment paper overhangs to lift the entire block out of the pan. Place it on a cutting board and use a sharp knife to cut it into squares. You can make them as big or as small as you like! Store your delicious sugar-free fudge in an airtight container in the refrigerator for the best results, where it will keep for up to a week. Enjoy this guilt-free indulgence!
Conclusion:
This sugar free fudge recipe is truly a game-changer for anyone craving that rich, decadent chocolate experience without the sugar overload. It’s incredibly satisfying to know you can indulge in a sweet treat that aligns with healthier eating goals. The simplicity of the ingredients and the straightforward process make it accessible for bakers of all levels, and the result is consistently smooth, creamy, and bursting with chocolate flavor. I’ve found it to be a perfect solution for satisfying those dessert cravings guilt-free.
Serving this sugar free fudge is a joy! It’s wonderful on its own as a small, satisfying dessert. I also love cutting it into bite-sized pieces and adding them to a platter of other keto-friendly treats for gatherings, or even crum extractbling it over a bowl of sugar-free ice cream. For variations, don’t be afraid to experiment! A pinch of chili powder can add a delightful warmth, a dash of peppermint extract offers a refreshing twist, or a swirl of sugar-free caramel can elevate it to another level of indulgence. I strongly encourage you to give this recipe a try – you won’t be disappointed!
Frequently Asked Questions:
What sweetener works best in this sugar free fudge?
While I’ve had great success with erythritol or a blend of erythritol and monk fruit sweetener, other granulated sugar substitutes like xylitol (ensure it’s safe for pets, as it’s toxic to dogs) or allulose can also work. The key is to find one that measures cup-for-cup like sugar and doesn’t leave a strong aftertaste.
Can I make this fudge without dairy?
Absolutely! For a dairy-free version, you can substitute the butter with a high-quality vegan butter alternative and use full-fat coconut milk or a sugar-free non-dairy creamer instead of heavy cream. Ensure your sugar-free chocolate chips are also dairy-free.
How long does sugar free fudge last?
Stored in an airtight container in the refrigerator, this sugar free fudge should stay fresh and delicious for up to two weeks. You can also freeze it for longer storage, though the texture might change slightly upon thawing.
Sugar Free Fudge
A simple and delicious sugar-free fudge recipe made with chocolate chips and almond butter.
Ingredients
-
2 cups sugar free chocolate chips
-
1 cup almond butter
-
1 teaspoon vanilla extract
-
1/4 cup unsweetened cocoa powder
-
1/4 cup unsweetened almond milk
-
1/2 teaspoon sea salt
Instructions
-
Step 1
Line an 8×8 inch baking pan with parchment paper, leaving an overhang on the sides. -
Step 2
In a medium saucepan over low heat, melt the sugar free chocolate chips and almond butter, stirring constantly. -
Step 3
Once smooth, stir in the unsweetened cocoa powder, unsweetened almond milk, vanilla extract, and sea salt until well combined. -
Step 4
Pour the mixture into the prepared baking pan and spread evenly. -
Step 5
Refrigerate for at least 2-3 hours, or until firm. -
Step 6
Lift the fudge out of the pan using the parchment paper overhang and cut into small squares.
Important Information
Nutrition Facts (Per Serving)
It is important to consider this information as approximate and not to use it as definitive health advice.
Allergy Information
Please check ingredients for potential allergens and consult a health professional if in doubt.