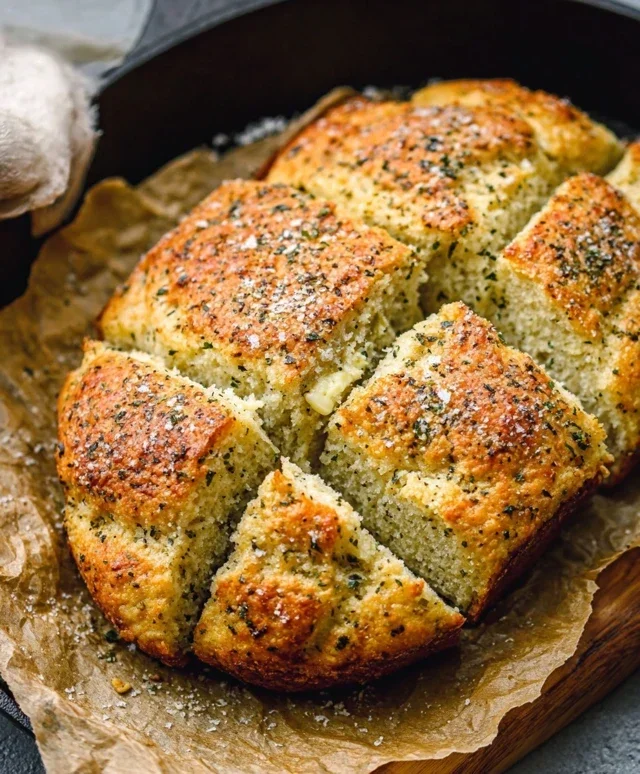
Garlic Butter Keto Bread – Easy Low Carb Loaf
Garlic Butter Keto Bread is a game-changer for anyone following a ketogenic lifestyle, and let me tell you, I’ve tried my fair share of keto baked goods! There’s something utterly magical about a warm, fragrant slice of bread, and this recipe delivers that experience without derailing your macros. We all crave those comforting flavors and textures, and this Garlic Butter Keto Bread perfectly captures that nostalgic essence of traditional bread, but in a delicious, low-carb package. What makes this version truly special is the incredible depth of flavor derived from the generous amount of garlic and rich butter, creating a golden crust and a wonderfully moist interior. It’s the perfect companion for your favorite keto meals, whether you’re dipping it into hearty stews, serving it alongside a flavorful chicken dish, or simply enjoying it on its own. Prepare to be amazed at how satisfying and indulgent this Garlic Butter Keto Bread truly is!
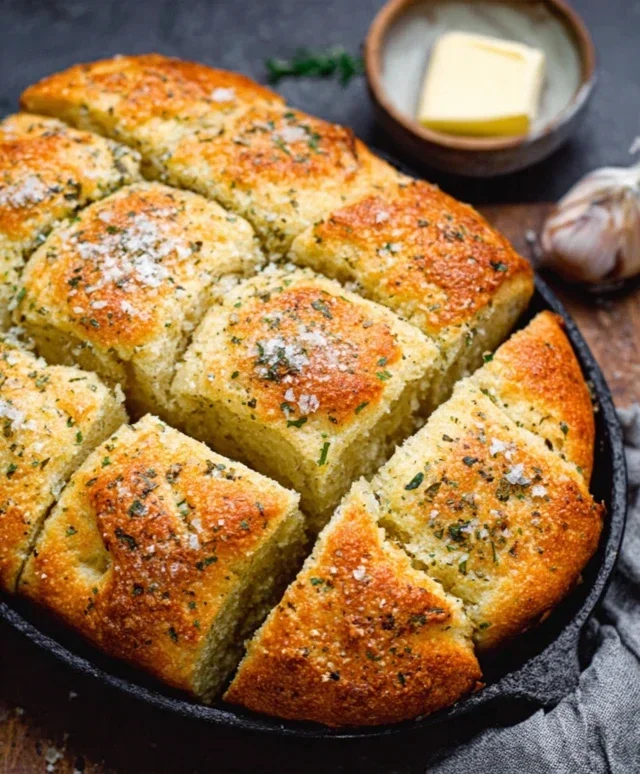
Garlic Butter Keto Bread
Welcome to a recipe that will change your keto baking game forever! If you’ve been missing the comforting aroma and satisfying chew of freshly baked bread, then get ready to rejoice. This Garlic Butter Keto Bread is incredibly easy to make, requires no special flours or complicated techniques, and delivers a flavor explosion that’s truly addictive. It’s the perfect accompaniment to your favorite soups, stews, or even just slathered with a little extra butter. This recipe is a staple in my keto kitchen, and I’m so excited to share it with you. Let’s dive in and create some deliciousness!
Ingredients:
Preparation and Mixing
The first step in creating this fantastic keto bread is to gather all of your ingredients and preheat your oven. This ensures that everything is ready to go when you are, preventing any last-minute scrambling. Preheat your oven to 350°F (175°C). While the oven is heating, prepare your baking vessel. I find a standard loaf pan (9×5 inches) works perfectly for this recipe. Grease it thoroughly with butter or line it with parchment paper. Parchment paper is a lifesaver for easy bread removal, so I highly recommend it if you have it.
Next, let’s focus on the dry ingredients. In a medium-sized mixing bowl, whisk together the almond flour and coconut flour. It’s important to get a good blend of these two flours for the best texture. Almond flour provides a good base and richness, while coconut flour absorbs moisture and helps create that bread-like crum extractb without the carb count. Add the baking powder and salt to this dry mixture. Whisk everything together until it’s well combined and there are no pockets of flour or leavening agent. This step is crucial for ensuring your bread rises evenly and has a consistent flavor throughout.
In a separate, larger bowl, crack your four large eggs. Whisk them until they are light and frothy. This incorporates a bit of air into the eggs, which will contribute to a lighter texture in the final bread. Now, add the melted unsalted butter to the eggs. Make sure your butter isn’t scorching hot, as you don’t want to cook the eggs. Stir in the full-fat sour cream. The sour cream adds a wonderful moistness and a subtle tang to the bread that complements the richness of the butter and the savory garlic. Finally, add your minced garlic. If you prefer a milder garlic flavor or are in a pinch, you can substitute with 1 teaspoon of garlic powder. Whisk these wet ingredients together until everything is smooth and emulsified.
Combining and Baking
Now comes the exciting part – bringin extractg it all together! Pour the wet ingredients into the bowl with the dry ingredients. Using a spatula or a wooden spoon, gently fold the ingredients together until just combined. Be careful not to overmix at this stage. Overmixing can develop the proteins in the almond flour, potentially leading to a tougher texture. You want to mix until you no longer see any dry flour. The batter will be thick, almost like a very dense cake batter, which is exactly what we’re looking for.
Now, carefully spoon the batter into your prepared loaf pan. Use your spatula to spread it evenly, making sure to get it right into the corners. You can even tap the pan gently on the counter a few times to help settle the batter and remove any large air pockets. For an extra touch of flavor and visual appeal, you can sprinkle some chopped fresh parsley over the top before baking. This is entirely optional, but it does make the bread look so inviting!
Place the loaf pan in your preheated oven and bake for approximately 40-50 minutes. The baking time can vary depending on your oven, so it’s a good idea to start checking for doneness around the 40-minute mark. The bread is ready when it’s golden brown on top, and a toothpick inserted into the center comes out clean. If you find the top is browning too quickly but the inside isn’t cooked through, you can loosely tent the loaf pan with aluminum foil for the remainder of the baking time. This prevents the crust from burning while allowing the inside to finish baking.
Cooling and Enjoying
Once your Garlic Butter Keto Bread is baked to perfection, remove it from the oven. Let it cool in the loaf pan for about 10-15 minutes. This initial cooling period in the pan helps the bread firm up before you attempt to remove it. After this, carefully invert the loaf pan onto a wire rack to release the bread. If you used parchment paper, this should be a breeze. If you greased the pan, you might need to gently loosen the edges with a knife before inverting.
Allow the bread to cool completely on the wire rack before slicing. This is probably the hardest part, as the aroma will be non-intoxicating! Slicing it while warm can result in a crum extractbly texture, so patience is key here for the best slicing experience. Once it’s completely cooled, use a sharp serrated knife to slice the bread into your desired thickness. This bread is absolutely divine when served warm, toasted, or even fresh out of the oven (after cooling, of course!). Slather it with butter, use it for mini keto sandwiches, or dip it into your favorite creamy soup. It’s also wonderful as a side to a hearty keto meal. Store any leftover bread in an airtight container at room temperature for a couple of days, or in the refrigerator for up to a week. You can also freeze slices for longer storage. Enjoy every delicious, carb-free bite!
Conclusion:
I’m so excited for you to try this Garlic Butter Keto Bread! It truly is a game-changer for anyone following a ketogenic lifestyle who misses the comforting joy of freshly baked bread. Its simplicity, combined with the rich, savory flavor profile, makes it an absolute winner. The tender, slightly chewy crum extractb, infused with that irresistible garlic butter aroma, is surprisingly satisfying and versatile. Whether you’re looking for a side to your favorite keto soup or stew, a base for a delicious sandwich, or just a delightful snack, this recipe delivers. I encourage you to get creative with it – the possibilities are truly endless!
Frequently Asked Questions:
Can I store this Garlic Butter Keto Bread?
Absolutely! Once cooled, I recommend storing any leftover Garlic Butter Keto Bread in an airtight container at room temperature for up to 2 days, or in the refrigerator for up to 5 days. For longer storage, you can slice it and freeze it, then toast slices directly from frozen.
What are some other flavor variations I can try?
The beauty of this recipe is its adaptability! You can easily swap out the garlic and herbs for other delicious combinations. Consider adding a sprinkle of shredded Parmesan cheese with the garlic, or try a “rosemary and thyme” version for a more rustic flavor. A pinch of red pepper flakes can add a subtle kick if you enjoy a little heat.
Is this bread suitable for begin extractners?
Yes, definitely! This Garlic Butter Keto Bread recipe is designed to be straightforward and forgiving, making it perfect for keto baking novices. The ingredient list is manageable, and the steps are clear. You’ll be enjoying delicious, homemade keto bread in no time!
Garlic Butter Keto Bread
A delicious and easy keto-friendly bread recipe with a rich garlic butter flavor. Perfect for low-carb diets.
Ingredients
-
2 cups almond flour
-
1/2 cup psyllium husk powder
-
1 teaspoon baking powder
-
1/2 teaspoon salt
-
4 large eggs
-
1/2 cup melted unsalted butter
-
1/4 cup water
-
2 tablespoons minced garlic
-
2 tablespoons chopped fresh parsley
Instructions
-
Step 1
Preheat oven to 350°F (175°C). Grease and flour a 9×5 inch loaf pan. -
Step 2
In a large bowl, whisk together almond flour, psyllium husk powder, baking powder, and salt. -
Step 3
In a separate bowl, whisk together eggs, melted butter, and water. -
Step 4
Add the wet ingredients to the dry ingredients and mix until well combined. The dough will be thick. -
Step 5
Stir in the minced garlic and chopped parsley. -
Step 6
Pour the dough into the prepared loaf pan and spread evenly. -
Step 7
Bake for 30 minutes, or until a toothpick inserted into the center comes out clean. -
Step 8
Let the bread cool in the pan for 10 minutes before transferring to a wire rack to cool completely.
Important Information
Nutrition Facts (Per Serving)
It is important to consider this information as approximate and not to use it as definitive health advice.
Allergy Information
Please check ingredients for potential allergens and consult a health professional if in doubt.